Building an Active Directory Test Environment: Detailed Walk-through
The purpose of this guide is to show my capabilities of creating technical documentation, and focuses on creating a virtual Active Directory playground at home. These are step by step instructions on the process I used to build this at my house, for me to be able to review, replicate, and to share with you!
What can this guide do for you?
Active Directory is a critical component in many organizations' IT infrastructure, and creating a virtual test environment for it is a valuable project that demonstrates your skills and knowledge in several key areas:
Infrastructure Design: Setting up a virtual Active Directory environment involves planning the structure, including domains, trusts, and organizational units. It's a significant aspect of IT infrastructure design.
Virtualization: Building this environment within a virtualized platform, such as VMware, Hyper-V, or VirtualBox, involves configuring virtual machines, networking, and resources, which is an IT skill in itself.
Windows Server Administration: Installing and configuring Windows Server, including domain controllers, DNS, and other related services, is a fundamental IT task.
Security: Securing the Active Directory environment is crucial. Implementing security policies, group policies, and access controls is a significant part of this project.
Testing and Troubleshooting: Creating a test environment allows you to experiment with changes, updates, and troubleshoot issues without affecting a live environment. This is a valuable aspect of IT project work.
Learning and Skill Development: For many IT professionals, setting up a test Active Directory environment is an opportunity to learn and improve their skills. It can also serve as a platform to experiment with new technologies and practices.
Hardware used:
- Operating System: Windows 11
- RAM: 32 GB
- Processor: AMD Ryzen 7 2700X Eight-Core Processor
- GPU: NVIDIA GeForce RTX 3070 Ti
- Storage: Samsung SSD 970 EVO Plus 500GB
Windows 11 features enabled:
- Hyper-V
- Virtual Machine Platform
- Windows Hypervisor Platform
- Windows PowerShell 2.0
Software used:
- Oracle VM Virtual Box
- Windows Server 2022
- Windows 11
- PowerShell
Table of contents:
- Create Windows Server Virtual Machine
- Set up Windows Server Virtual Machine
- Server Configuration
- Installing Active Directory
- Configure the Domain Controller
- Check Connections
- Configure Active Directory
- Join a Windows 11 Machine to Active Directory Domain
Create Windows Server Virtual Machine
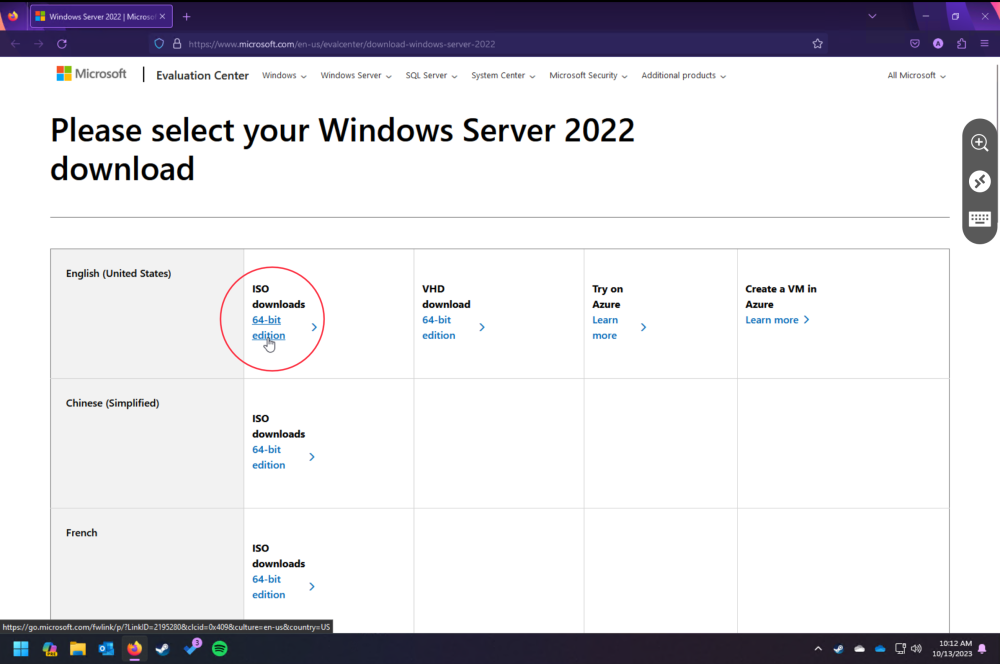
First, I downloaded the iso file for Windows Server 2022 from Microsoft. This download provides a free 180 day trial activation for the operating system.
Once the download was done, I moved the file from my Downloads folder to an organized directory I created for spinning up virtual machines, using PowerShell.
I opened Windows Terminal as administrator
In the Terminal, I changed the directory to my downloads directory, and moved the ISO file to the “iso-files” directory in my F drive:
PowerShell >
# change directory to Downloads
cd Downloads
# move iso file from Downloads to F:\iso-files
mv SERVER EVAL_X64FRE_en-us.iso F:\iso-files
# check if the move was successful
ls F:\iso-files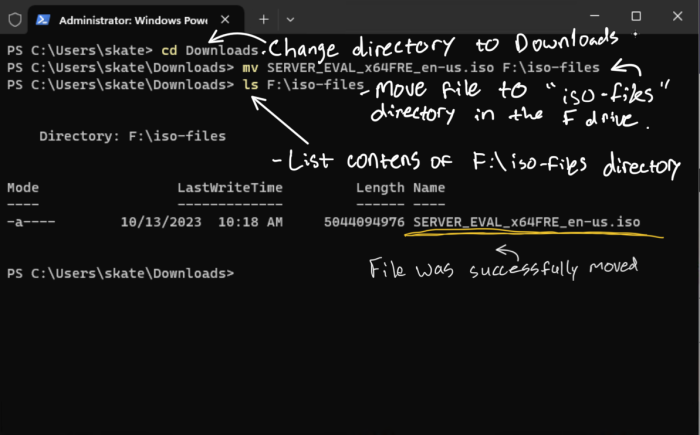
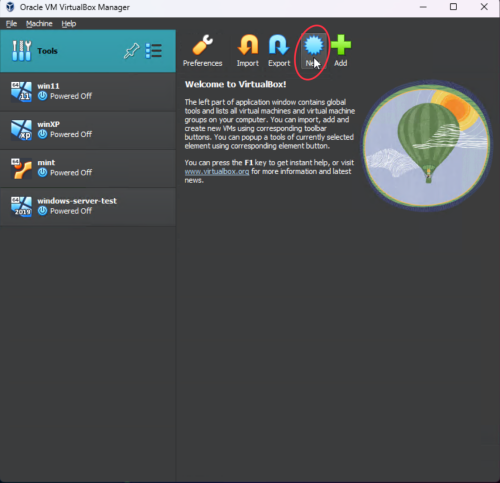
Then open Virtual Box, and click “New”
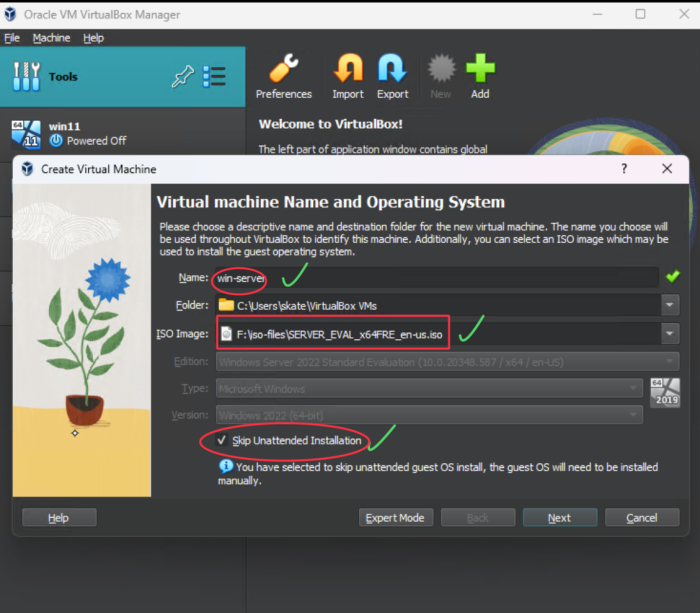
Name the Virtual Machine, then attach the windows server iso file to the virtual machine.
Click on the drop-down arrow for the “ISO Image” field and click “other”
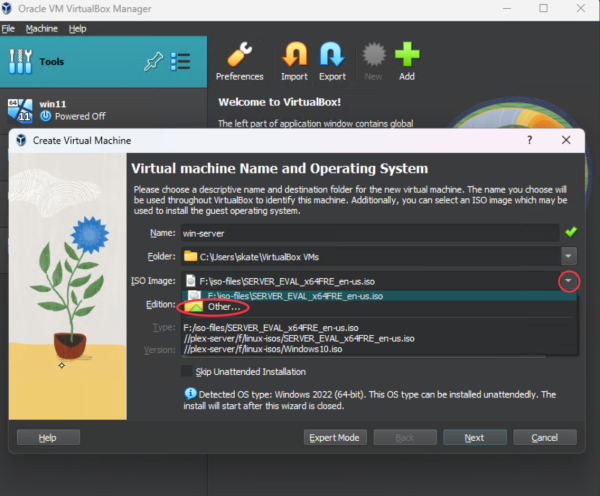
In the file path bar, type the location of the iso image, in my case, it’s “F:\iso-files”
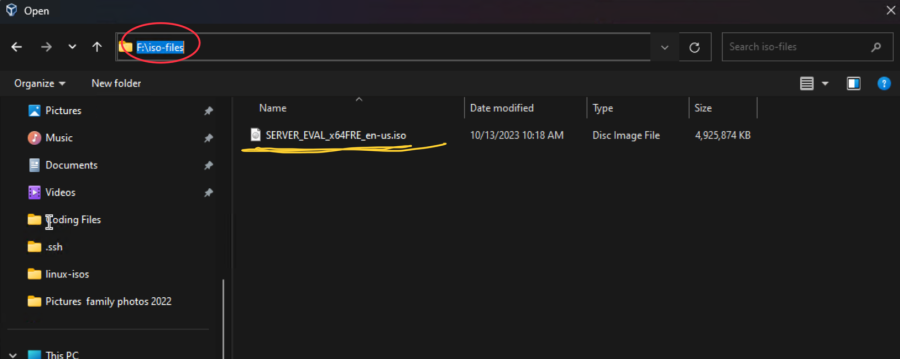
Select the ISO image and click “Open”, or double click the iso image file.
Then, check “Skip unattended installation”, that way we can manually install the operating system.
Your screen should look like this at this point:
Click “Next” to set virtual hardware for Virtual machine
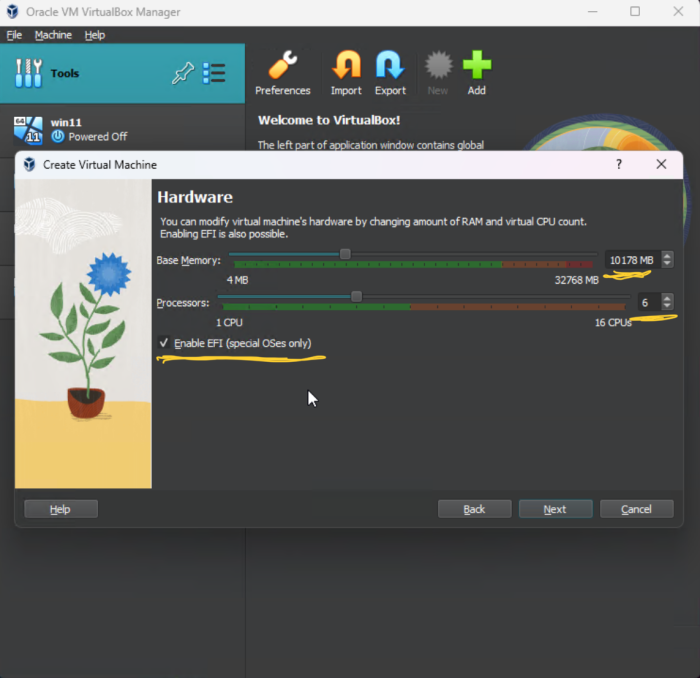
I set my resources at 10178 MB of RAM
6 processors
Feel free to increase or decrease these values for the need of your specific machine, be mindful to not go below the minimum hardware requirements for the Windows Server operating system.
and I checked “enable EFI”
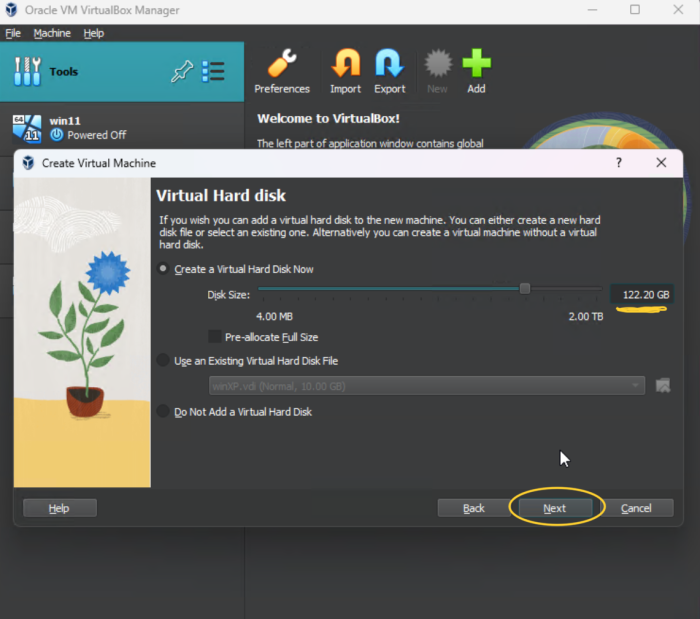
Click “Next” to set up virtual hard drive (VHD)
I set my VHD to 122.20 GB, feel free to use less but use at least 50 GBs to avoid issues.
Then click “Next”
Review allocated settings and confirm they are accurate, then click “Finish”

We should now have a Windows Server virtual machine ready to power on and configure.
Set up Windows Server Virtual Machine
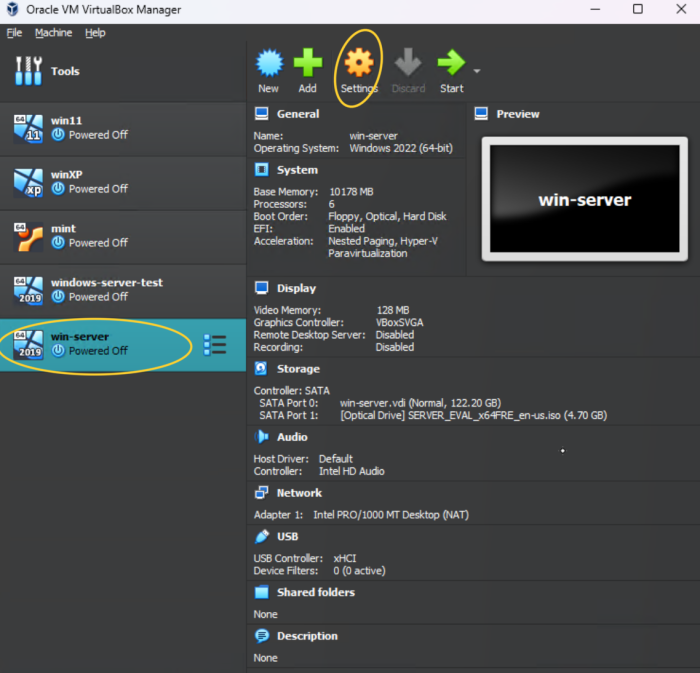
Before we power it on, let’s go into the settings.
In the settings of our virtual machine, navigate to “Network”, and change the attached network adapter from NAT to “Bridged Adapter”, this way, our VM will be using the host’s network adapter, giving this VM access to the internet.
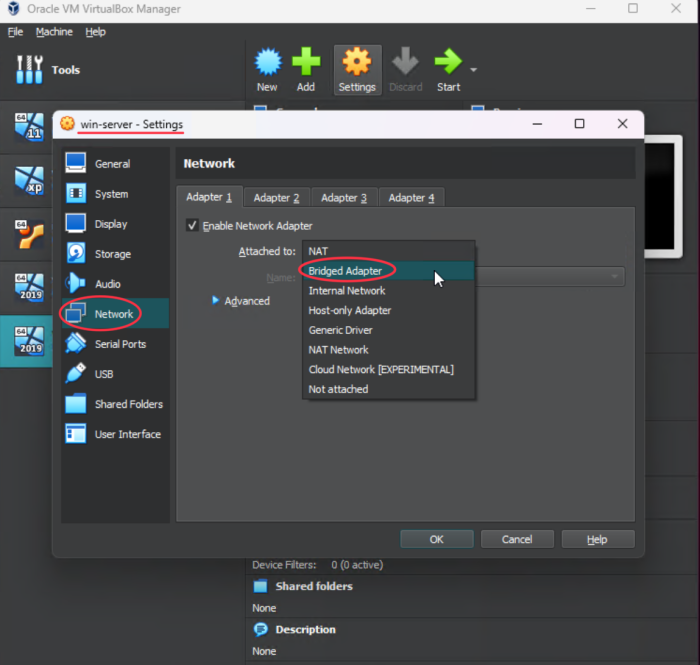
Verify that the correct adapter from the host is being used, then click “OK”

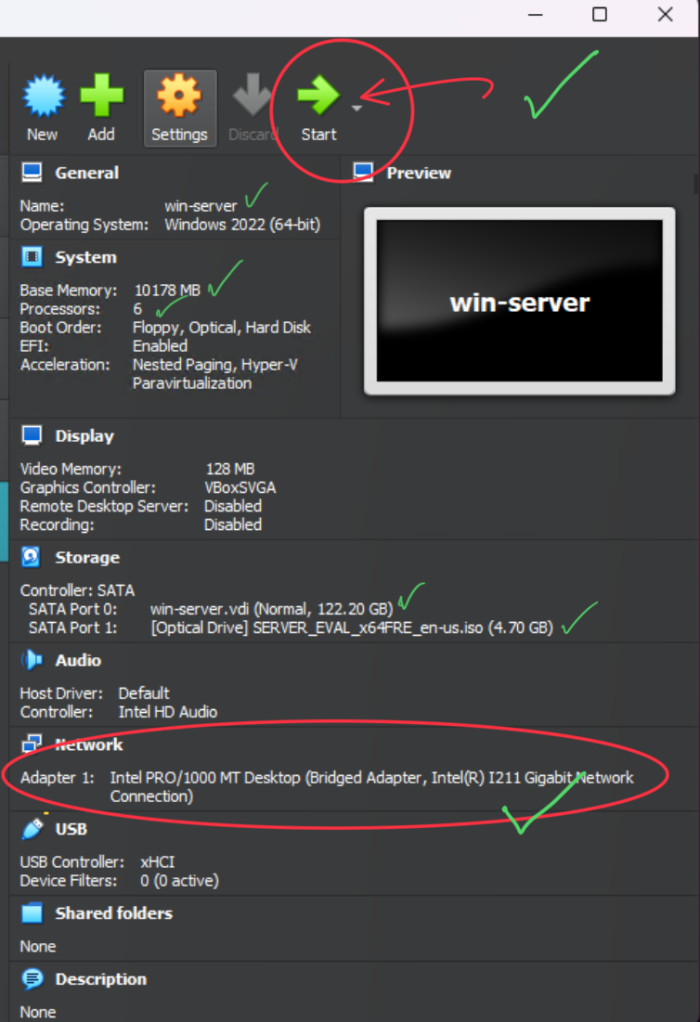
Next, review settings and hardware one more time just to make sure everything is squared away, and verify the network adapter was changed.
Then we can click “Start” to power on the virtual machine.
Once the VM starts, click any key to boot from the ISO image
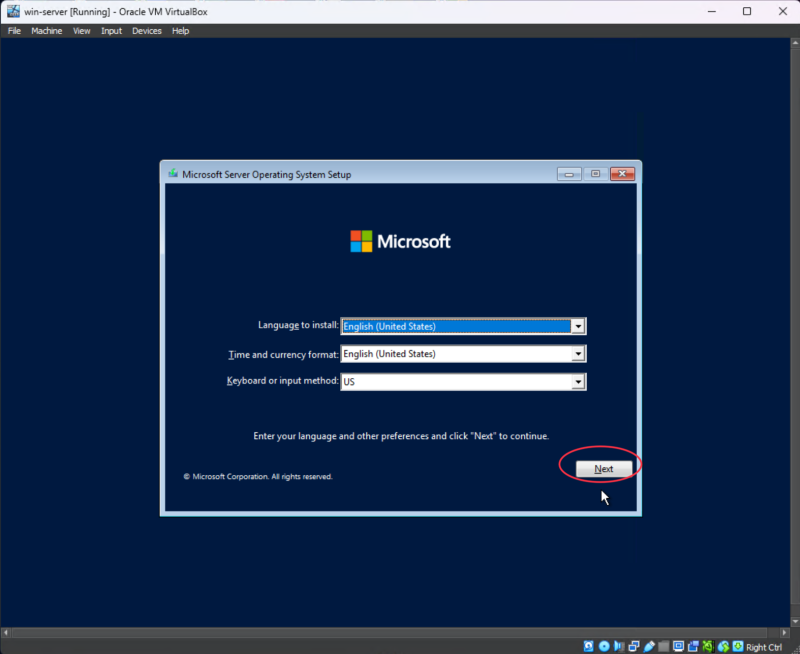
Once booted, we are welcomed by the Windows installation wizard. Ensure language, keyboard layout, and timezone are correct, and click “Next”
Then click “Install now”
After setup initialization is done, we need to select an operating system.
We will be using the Standard version with Desktop experience.
Then click “Next”
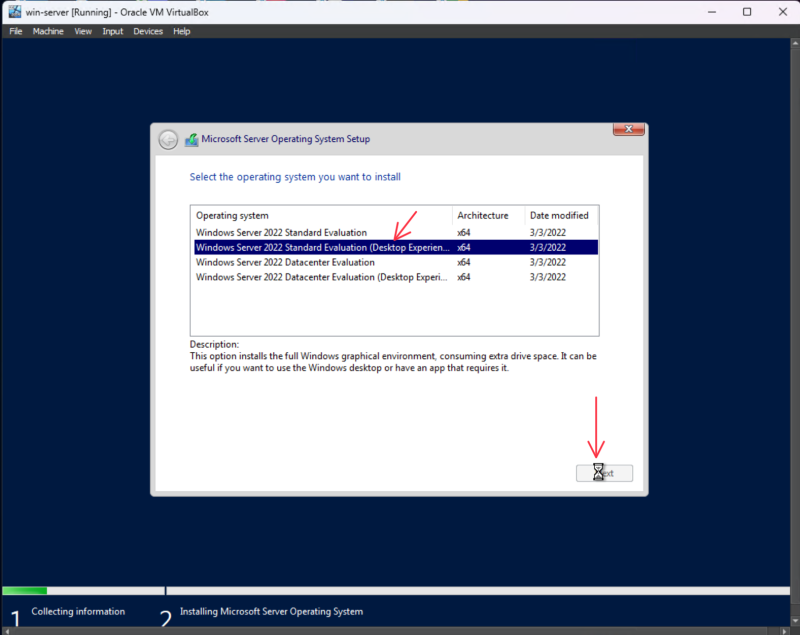
(We need the desktop experience for the Server Manager application, which we will get into later within this guide.)
Accept terms and click “Next”
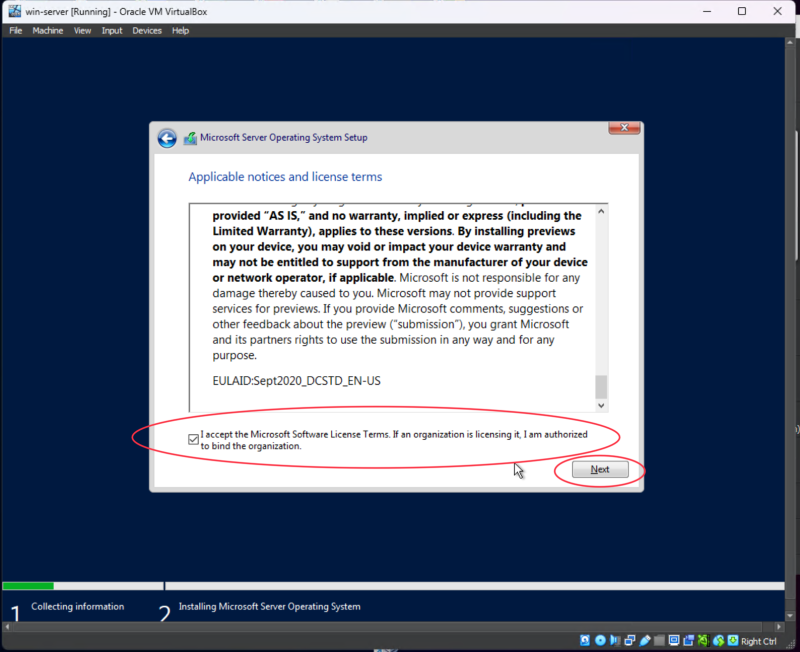
Then, select custom install
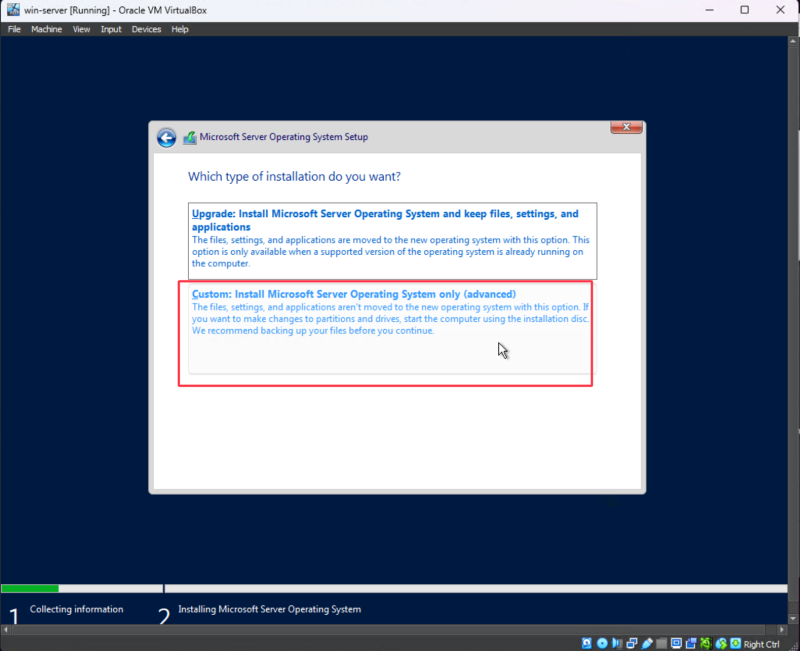
Then select the virtual hard drive we created in virtual box, and click next

Then just wait for files to finish installing - feel free to step away from the screen for a coffee break while this loads!
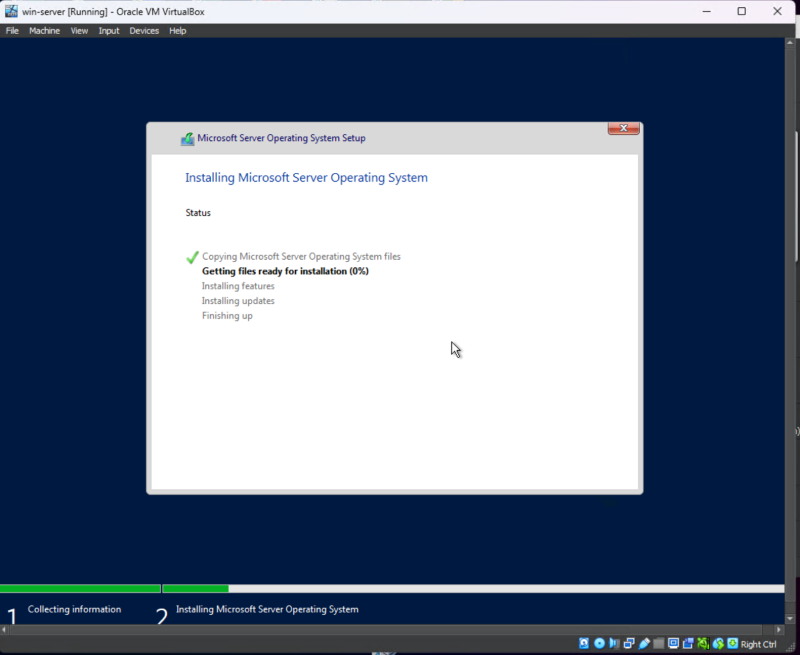
When the files finish downloading, let it reboot.
Do not hit a key to boot from cd/dvd, we want to let it reboot on it's own so we load into the installed operating system, rather than our ISO file.
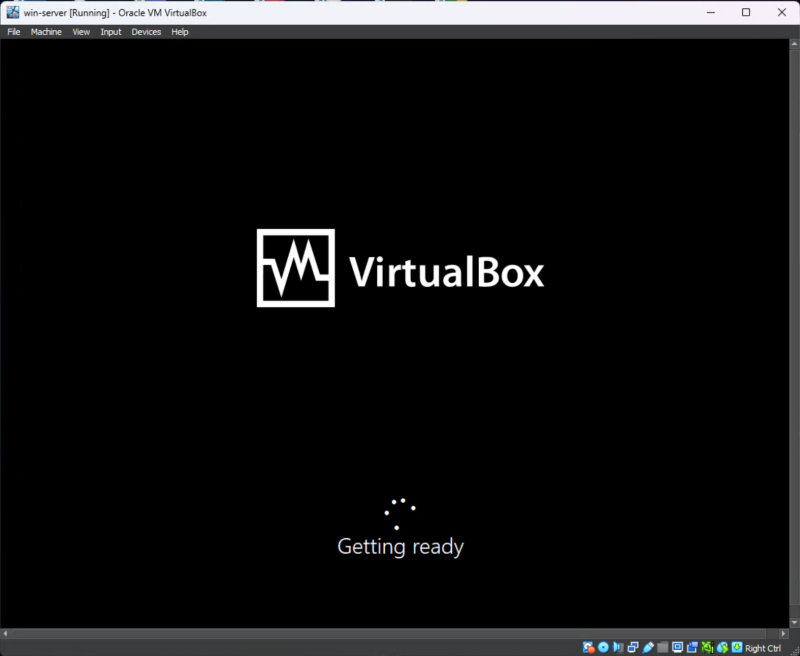
Once booted, you’ll need to create the Administrator password. Then click finish.

Then once set up finishes, you’ll be presented with a windows screen saver. Press CTRL + ALT + DELETE to access the log in screen.
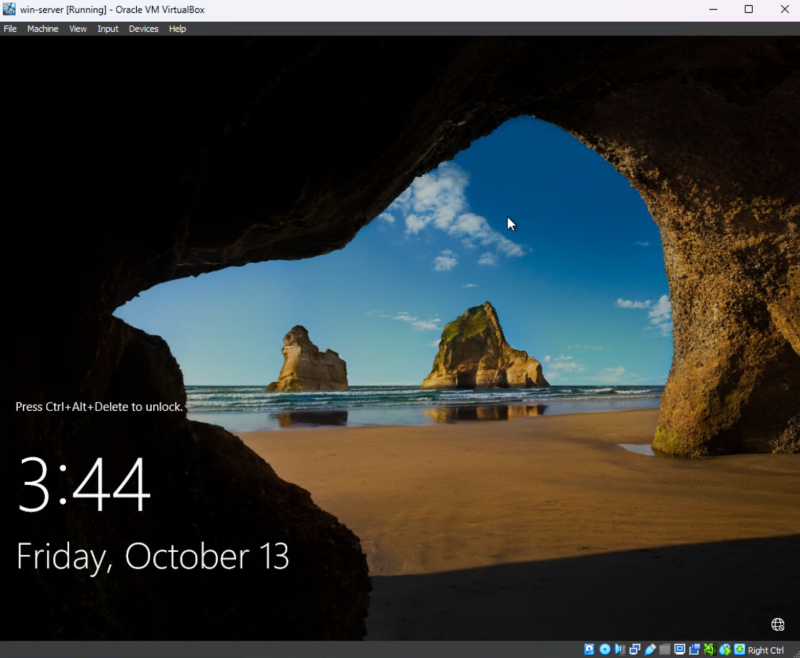
with a username of Administrator… Type in the password you set, and log in.
Once logged on, we need to ensure our network is connected, and check for updates, and install them.
In the search bar, type “check for updates” and hit “Enter”.
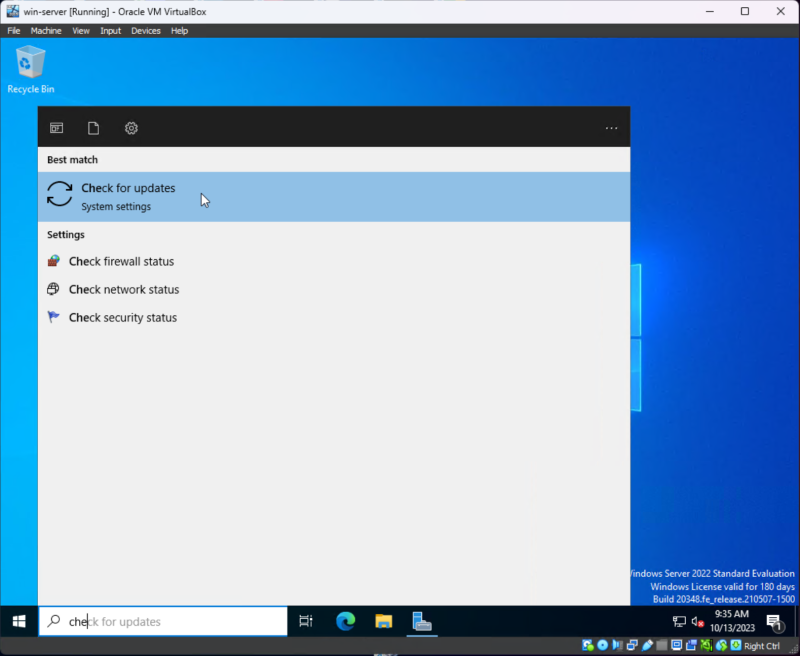
Click check for updates again and let the system find and install the updates
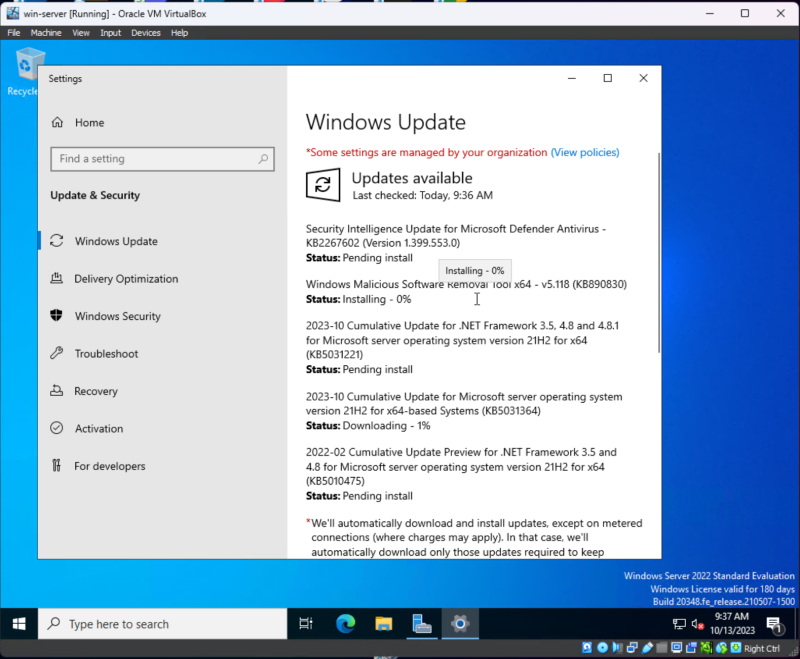
Now would be a great time for a second coffee break!
Take it easy on your eyes and step away while this finishes up.
Once all the updates are done downloading, we need to restart the machine for the updates to take effect.
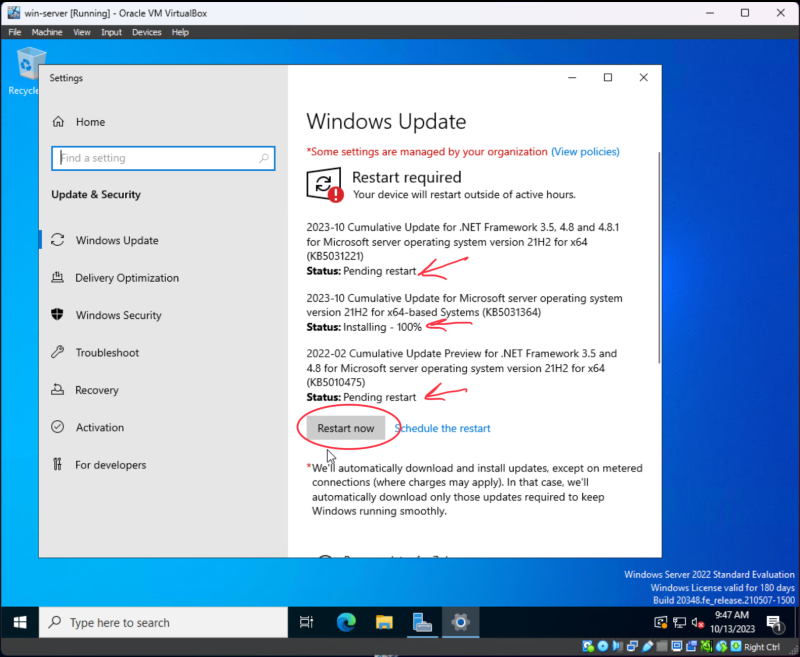
Click restart and let the machine finish updating and reboot, then log back in.
Server Configuration:
After logging back in, “Server Manager” should open up, if not, search for it in the search bar and open it. Then, click “Configure this local server”

That will bring you to the dashboard for this local server. Here, you will find links to the settings we need configure.
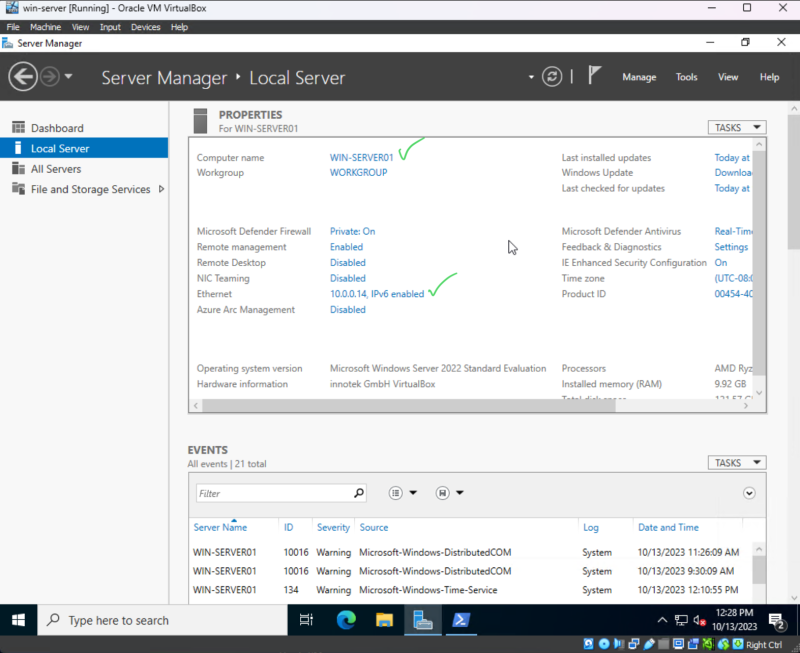
First, we are going to rename the computer, then set a static IP address for the machine.
Click on the link in the "Computer name" field showing the current name of the server to go to “System Properties”

In the System Properties under the Computer Name tab, click the “Change” button

Type in a new name for the server, and click “OK”, Then, the machine will want to reboot. Click “OK” on the reboot warning, and close System Properties.

You should now be greeted with another message box asking if you would like to restart now or later. Click “Restart Now”
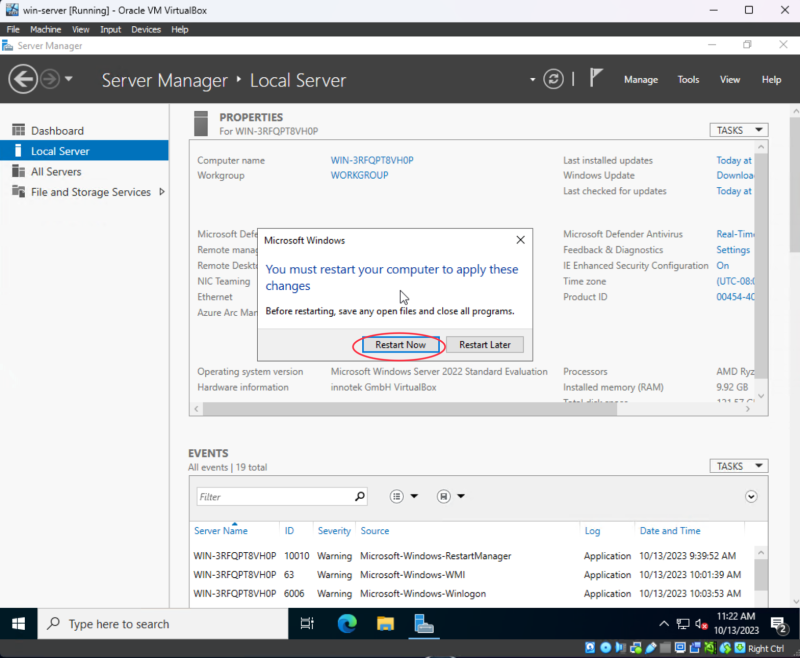
After the VM reboots, log back in, open Server Manager, and click on “Configure this local server” again
In the Ethernet section, we have a link to configure network adapter settings. Click that link.
(It’s currently getting its IP address from the gateway’s DHCP server.)
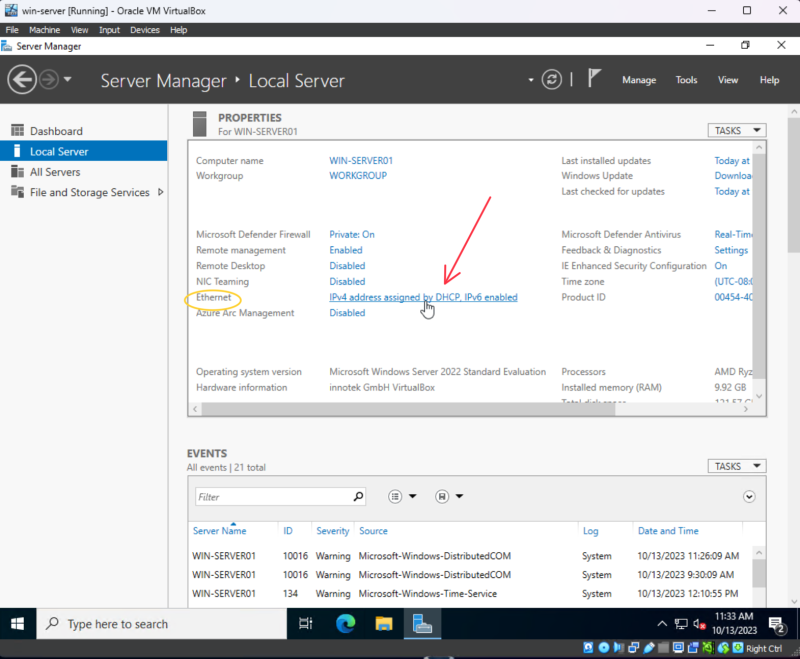
Right click on the shown Network adapter, and click properties.
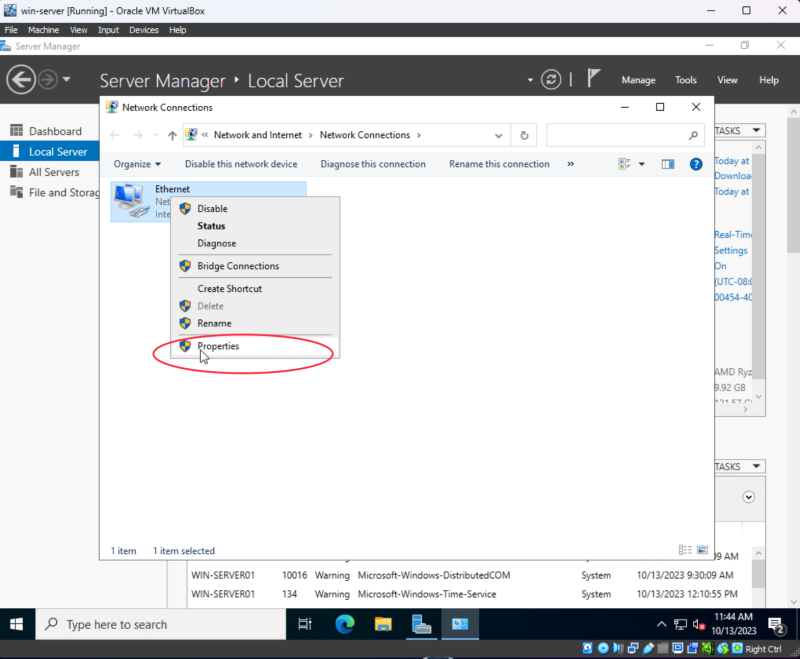
Click on “Internet Protocol Version 4 (TCP/IPv4)”, then click on “Properties”

We are going to use the same IP address the DHCP server gave us, but we are going to set it statically.
We should be at this screen now:
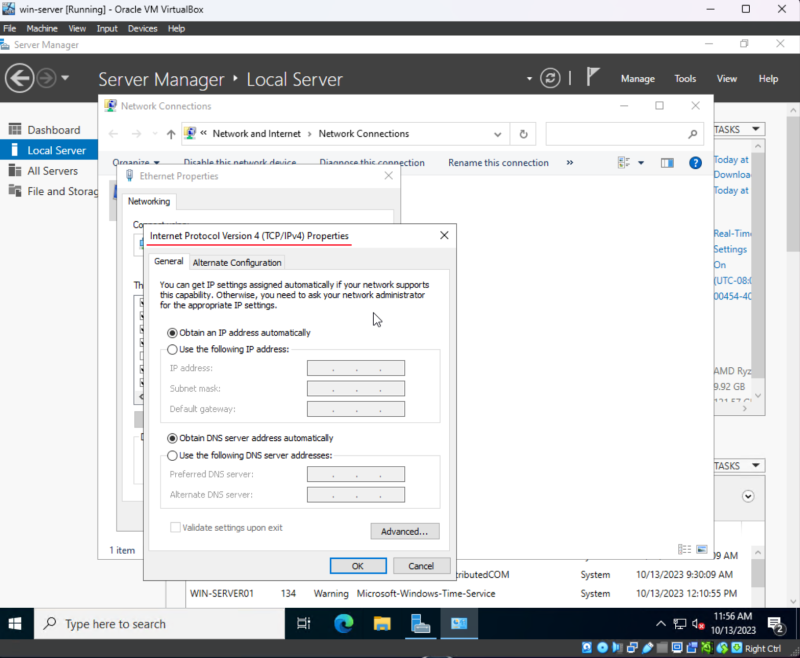
Before moving on, open PowerShell to collect our IP address and subnet mask.
In PowerShell, run these commands:
PS >
    ipconfig | Select-String 'ipv4'
    ipconfig | Select-String 'subnet'
Doing this will return the current IPv4 address and subnet mask.

Return to the ipv4 properties we opened earlier, Select “Use the following IP address:” Then type in the IPv4 address we obtained from PowerShell, and the subnet mask and your gateway router’s IP address for default gateway.
For DNS server, we will also use the same IP address. Since this machine will be our DNS server and domain controller.
Then click “OK”
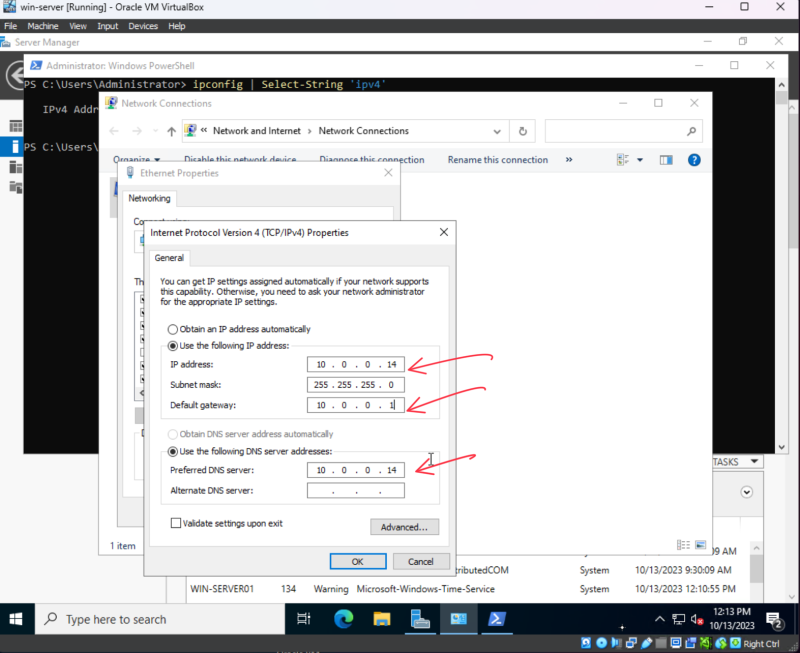
Now close the properties menus. Ensure that the settings we set have been updated successfully
Installing Active Directory:
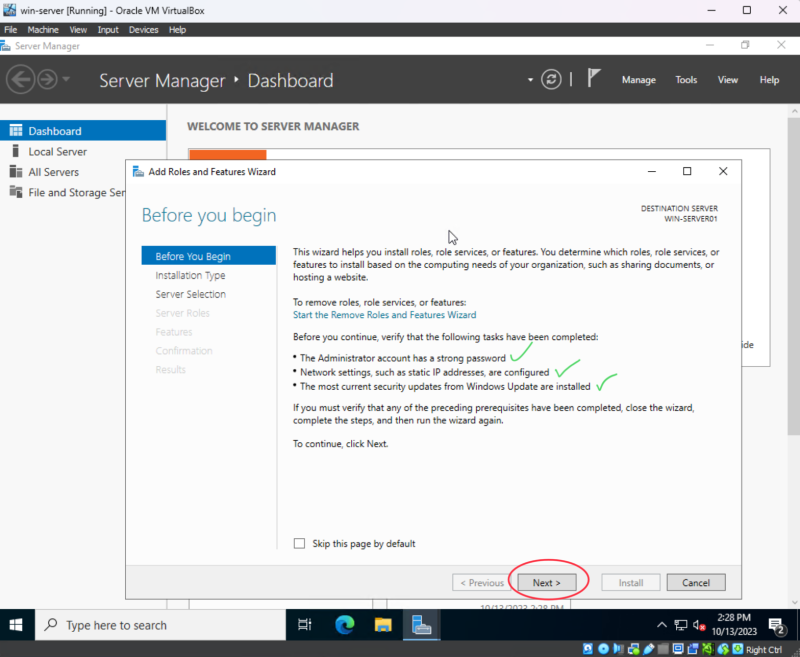
Now go to “Manage”, “Add Roles and Features”
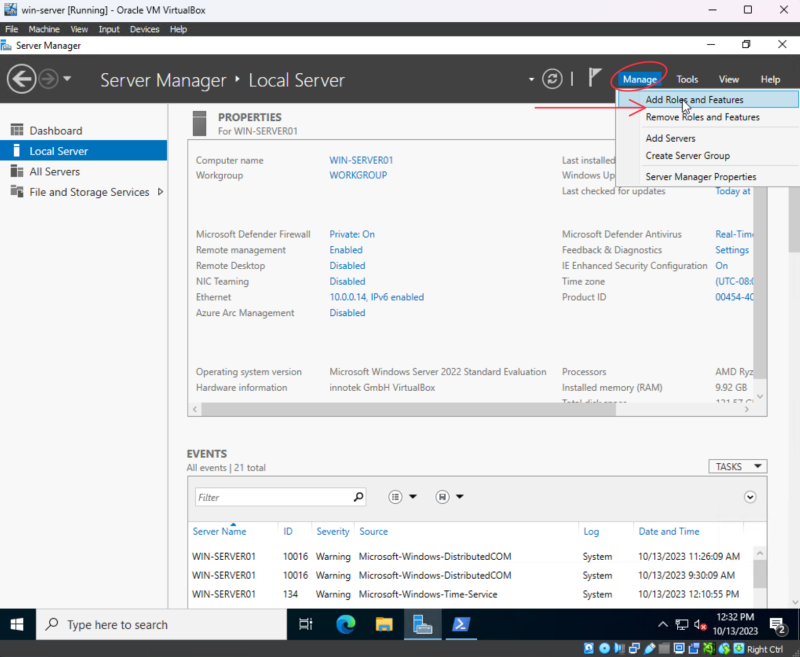
This will open the feature wizard.
This page just wants you to ensure we have done everything we need before adding roles and features.
Which we have as long as this guide was followed step by step up to this point.
Click “Next”
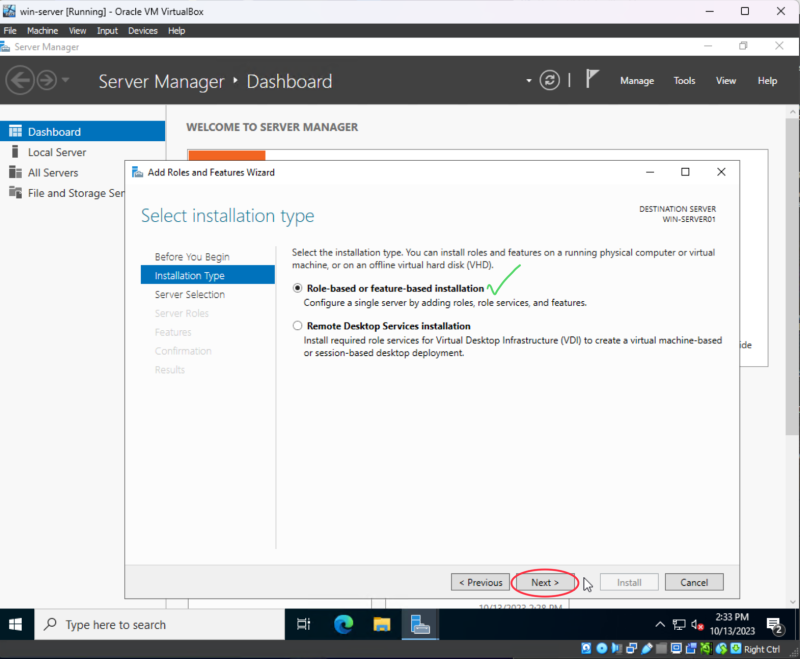
We are going to roll with the default selection here of “Role-based or feature-based installation”
Click “Next”
Next we need to select our server from the server pool, then
Click “Next”

This is where we can start selecting our services we want to add to the server.
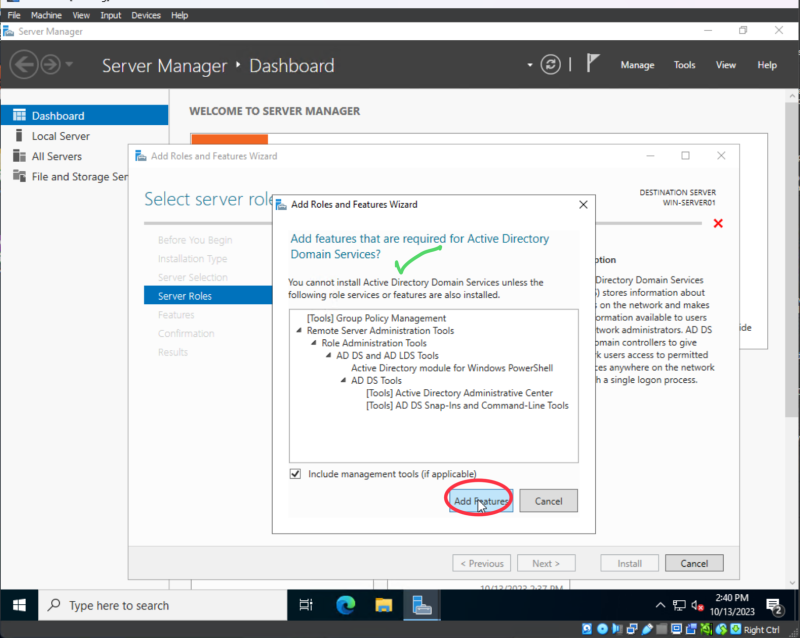
For Active Directory, we need to add “Active Directory Domain Service” (AD DS)

And the rest of the services it needs to accompany AD DS.
Click “Add features”
Then click “Next”
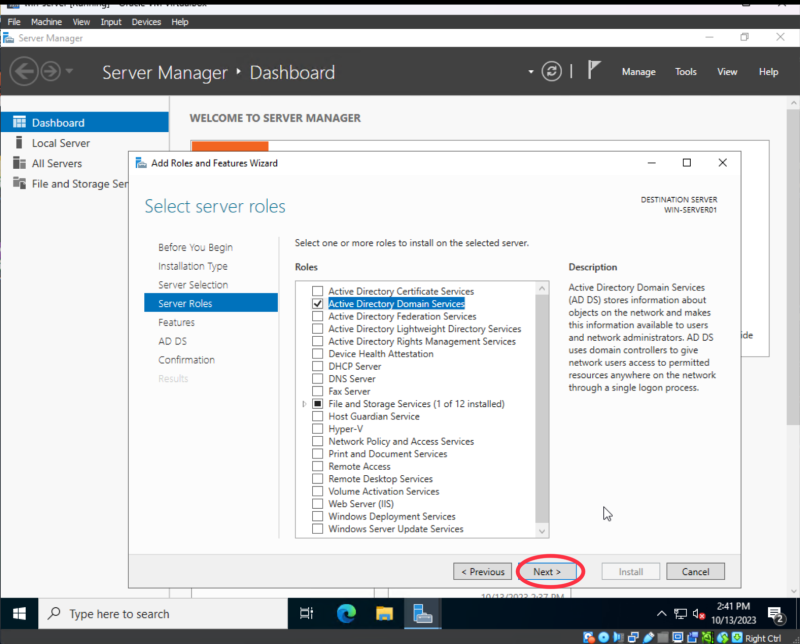
Then click “Next” again, there’s nothing else that we need to add here.
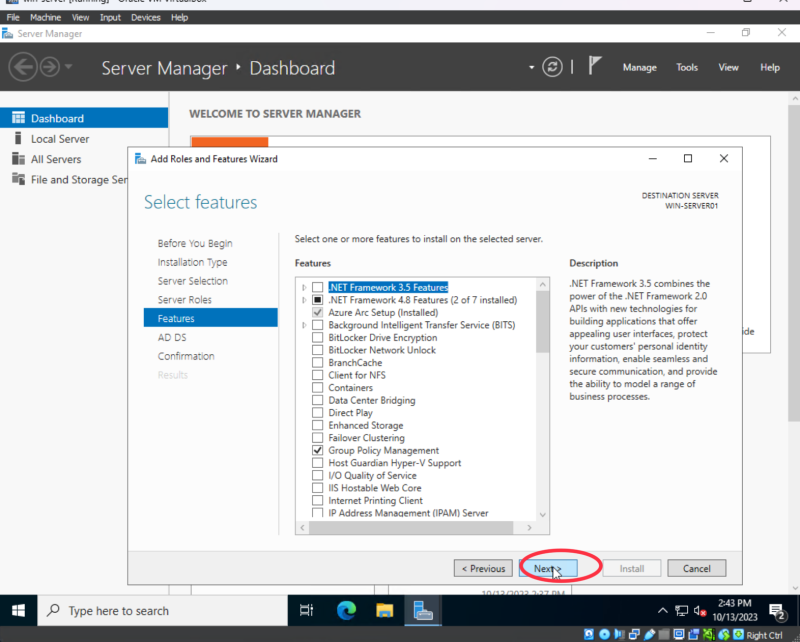
and click next again
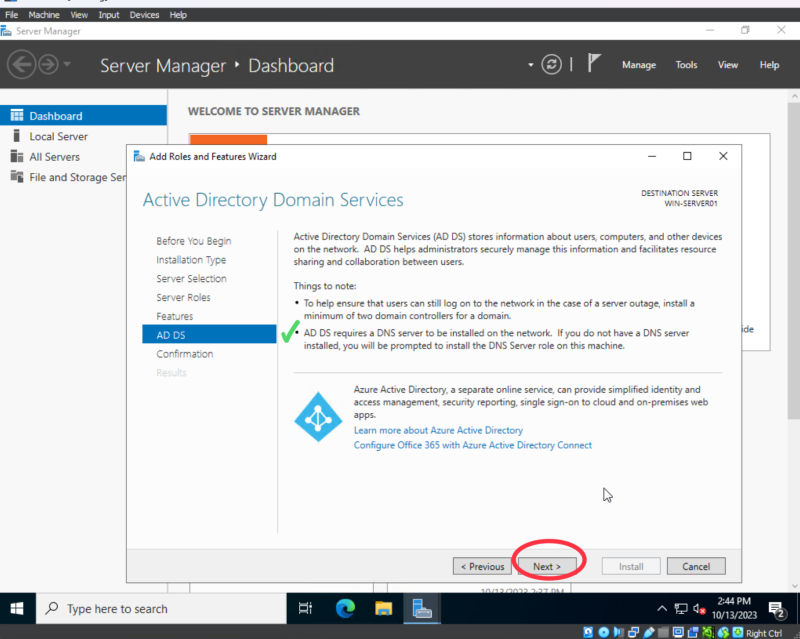
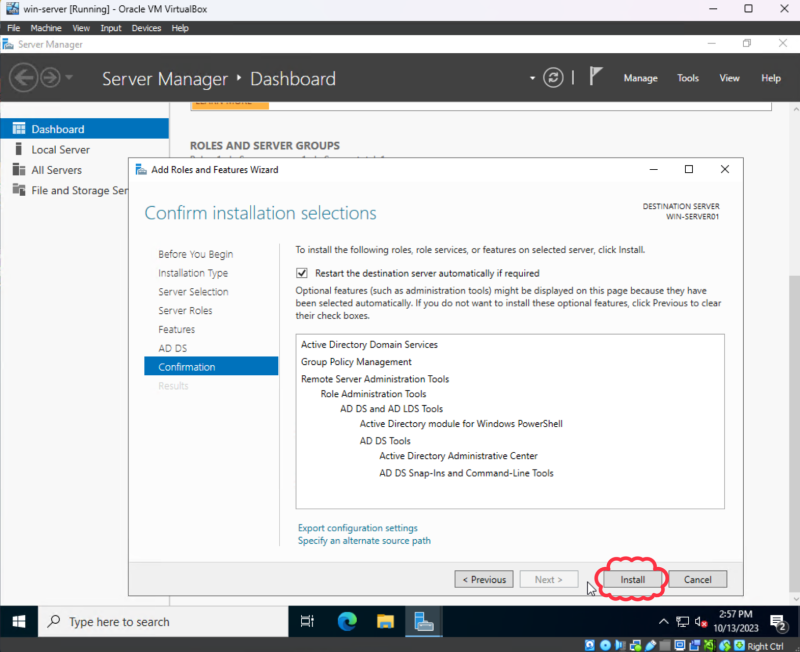
On this page,
Check “Restart the destination server automatically if required” field
Then click “Yes”

Then click “Install”
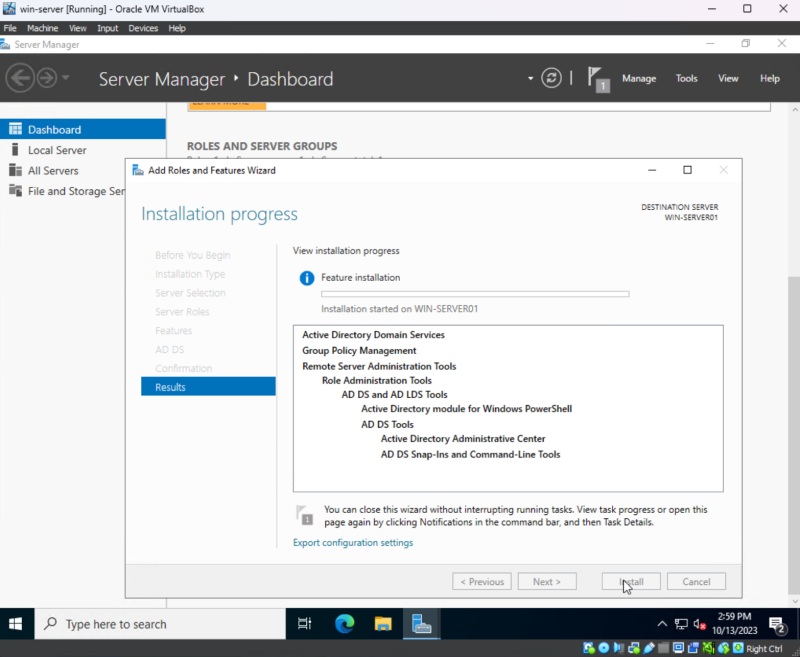
Now allow the features to install.
Configure the Domain Controller:
Once finished, you’ll be prompted for additional configuration.
In server manager, click on “Notifications”
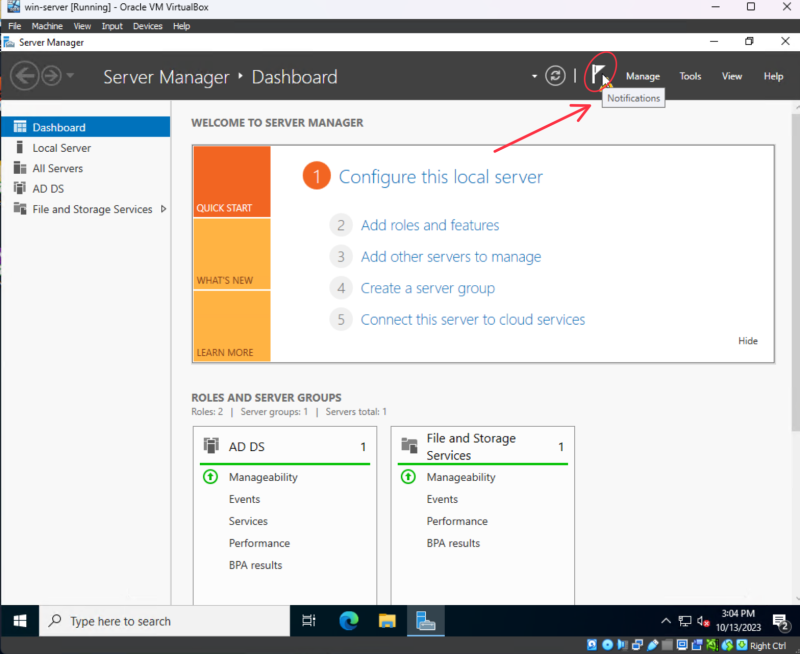
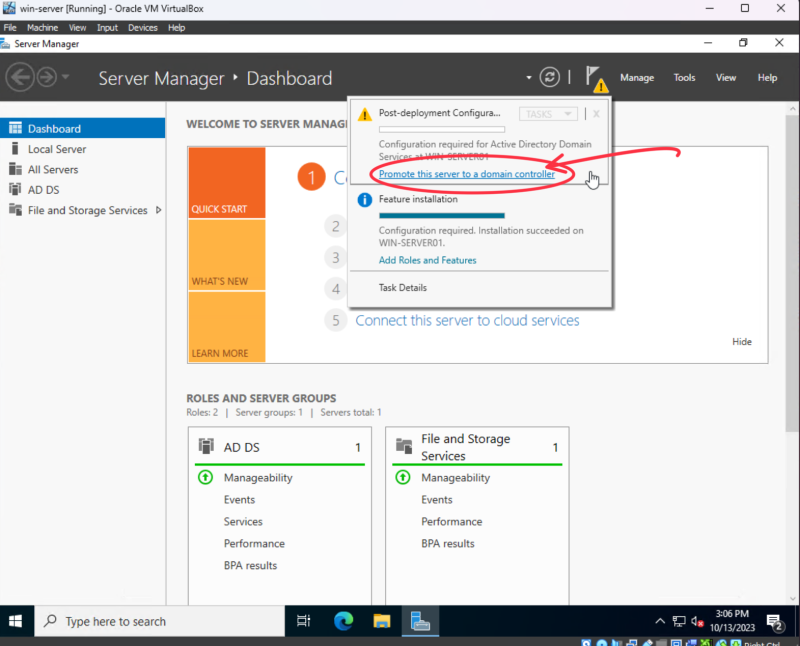
There should be a notification that says “Promote this server to a domain controller”
Click on the link to perform post-deployment configuration.
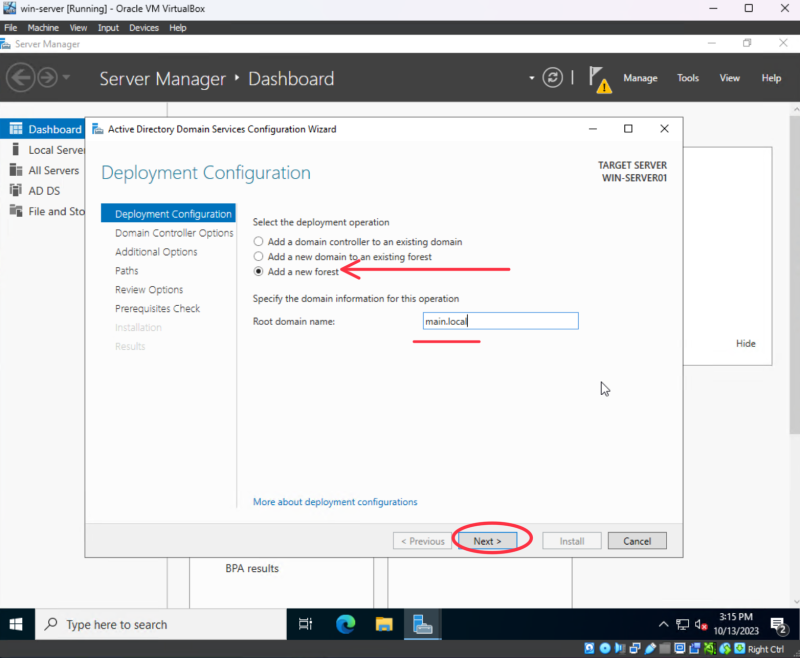
Once in the configuration wizard,
Select “Add a new forest”, and name it.
Something like “main.local”
Then click “Next”
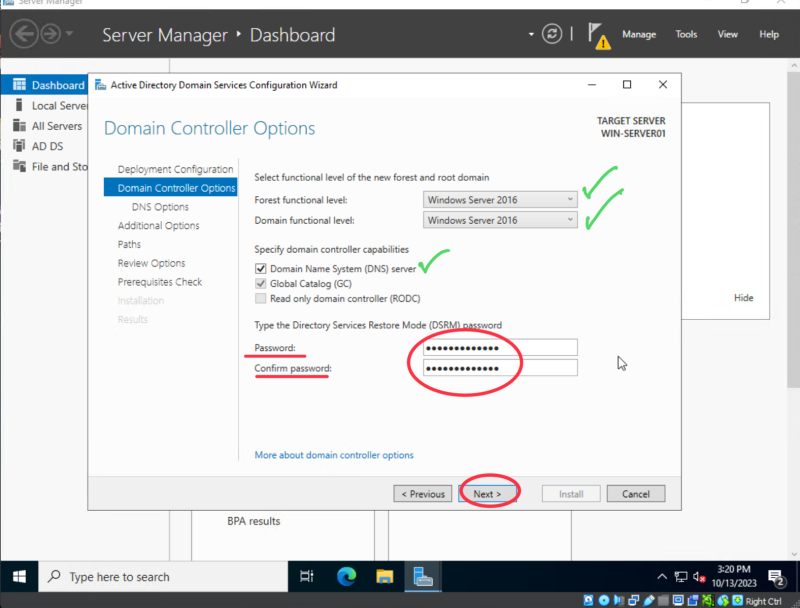
Next,
You’ll need to create a password for the domain
Ensure domain controller capabilities possess a Domain Name System (DNS Server) default
Then click “Next”
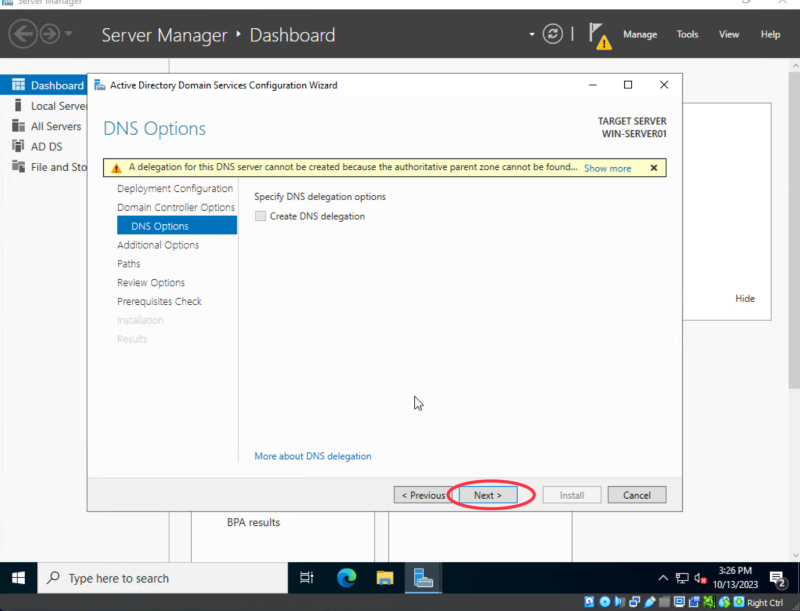
After that, you may get a little warning about DNS delegation.
This is normal, as laid out by Microsoft's technical documentation, this error is "by design".
Feel free to check out their documentation on this specific error if you wish, HERE
Microsoft's resolution for this error is to ignore it. However, they also say, "Don't skip prerequisite checks in order to suppress this message"
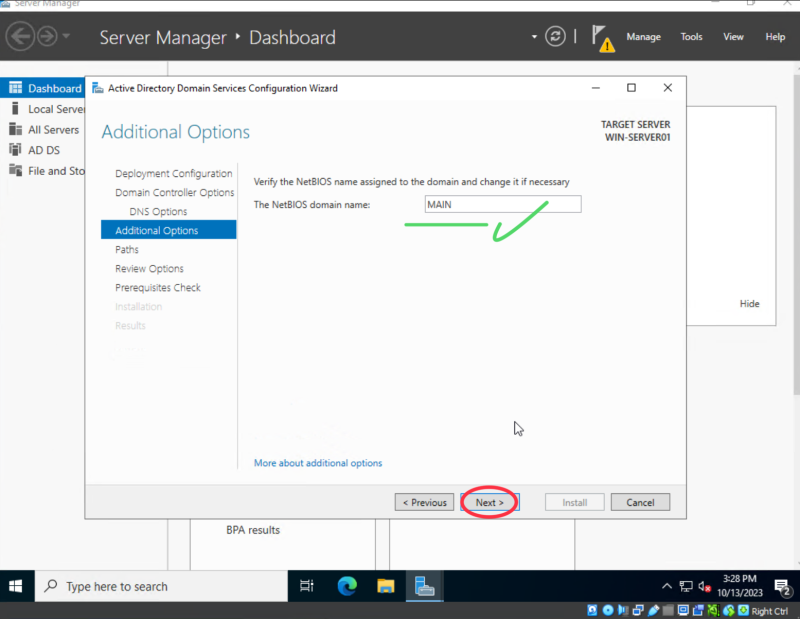
Next, it will generate a NetBIOS name.
Which should be in all caps and contain only the first section of the domain name you created before the period.
In my case, my domain is ‘main.local’ so a NetBIOS name of "MAIN" should be fine.
Then click “Next”
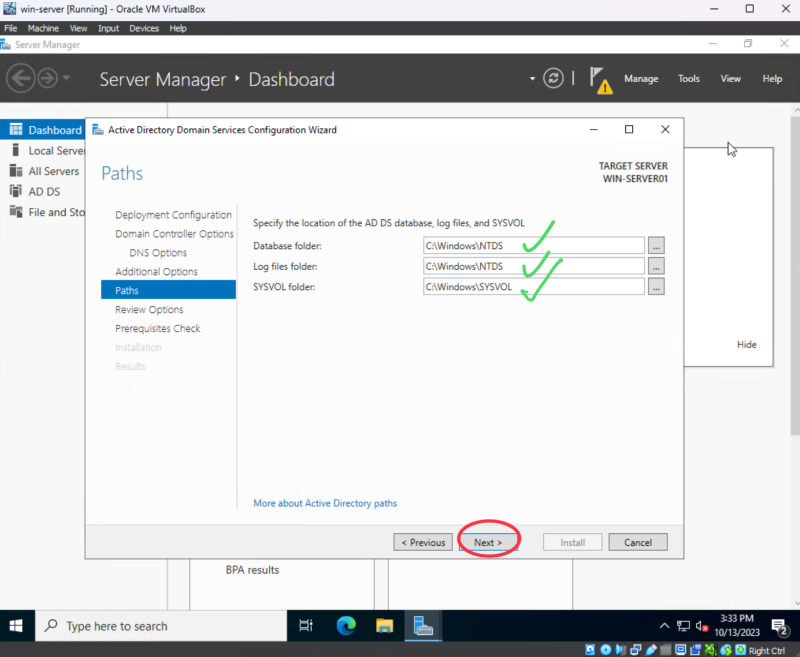
Next we need to specify the location of the Active Directory database. The defaults should be just fine.
Click “Next”
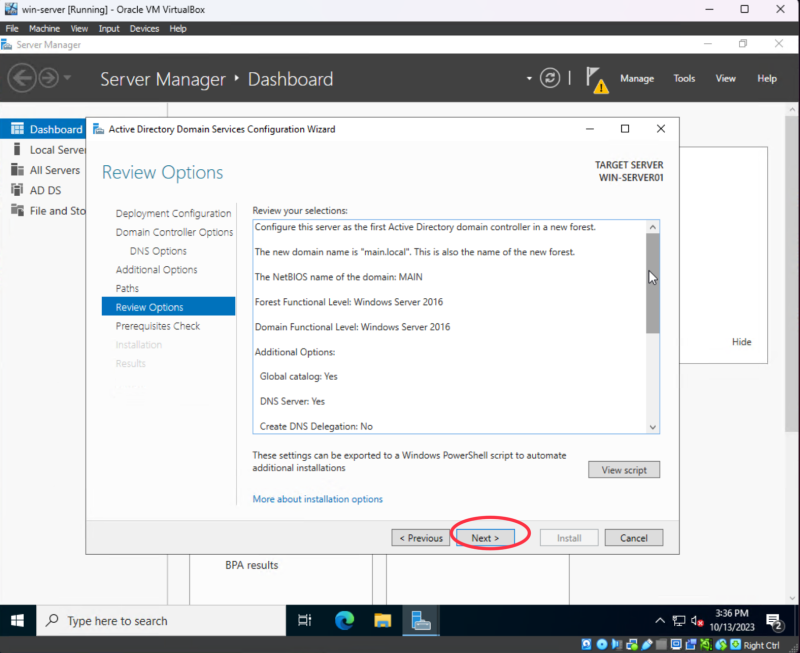
Now we just review our selections,
and click “Next” again
From here, we should have a prerequisite check run.
As long as we set up everything correctly, it should pass, and we should be ready for installation.
Click “Install”
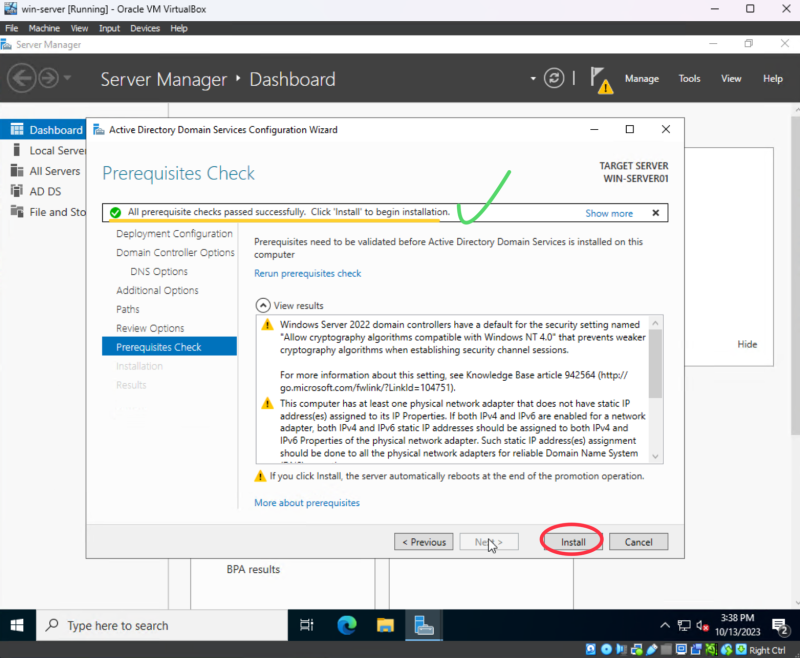
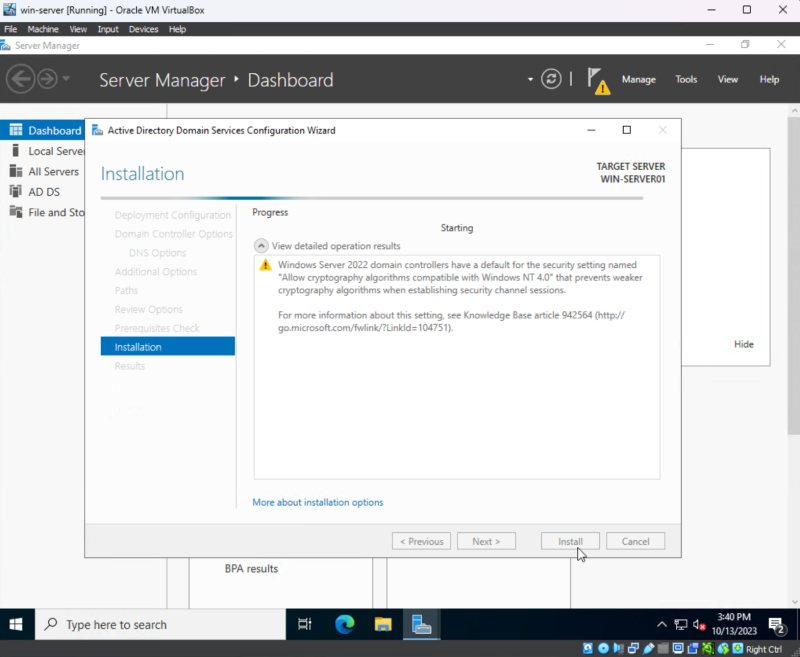
Now just let it install and take a coffee break!
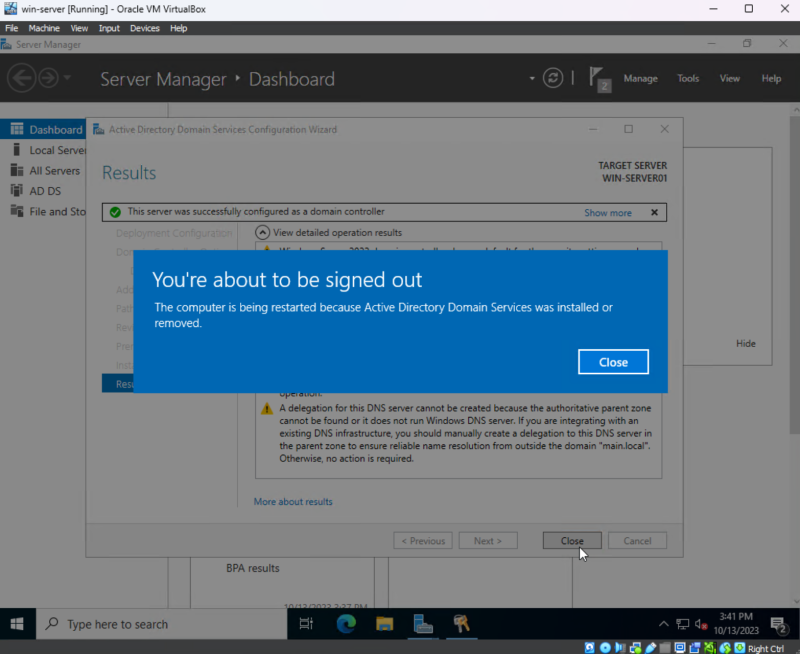
Once it’s done, it will reboot, and let you know you are going to be signed out
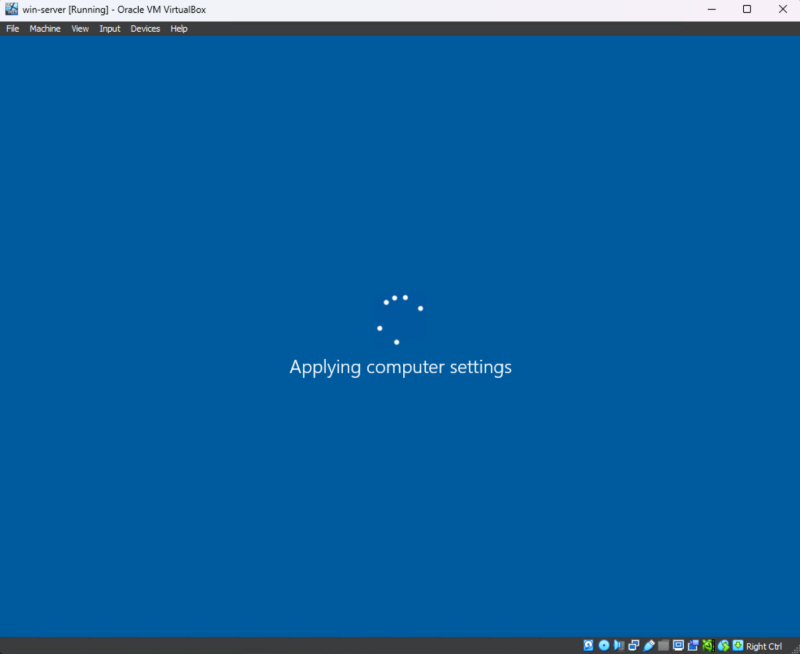
Let the machine reboot and apply the settings
Once settings are finished being applied, we should be back at the Windows screen saver.

Check connections:
Press CTRL + ALT + DELETE, and we should now be prompted to login to the new domain we created. The password will be the same as the local administrator account. Type it in and log on
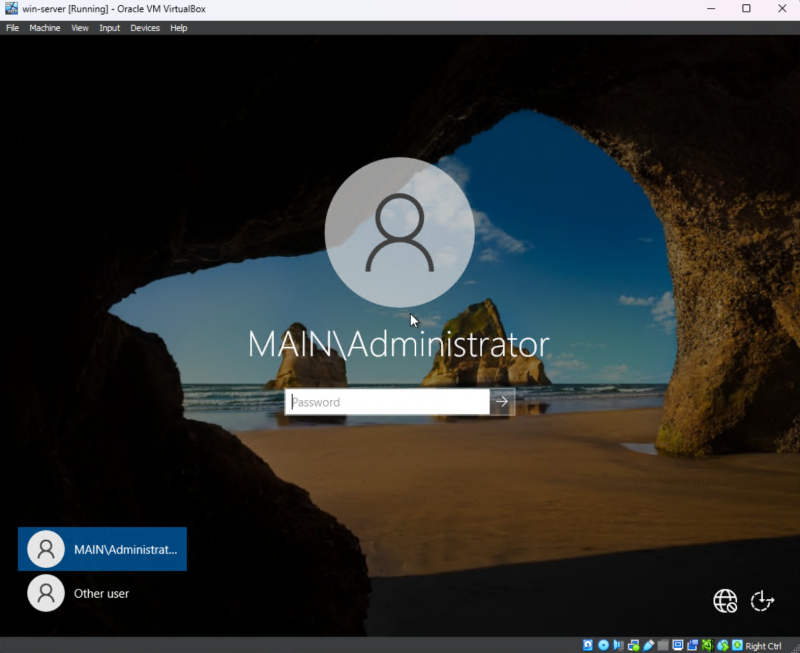
After logging in, allow services to start up.
Then open PowerShell so that we can run the nslookup tool.
We should be able to lookup our domain name and it should return the IP address of our machine.
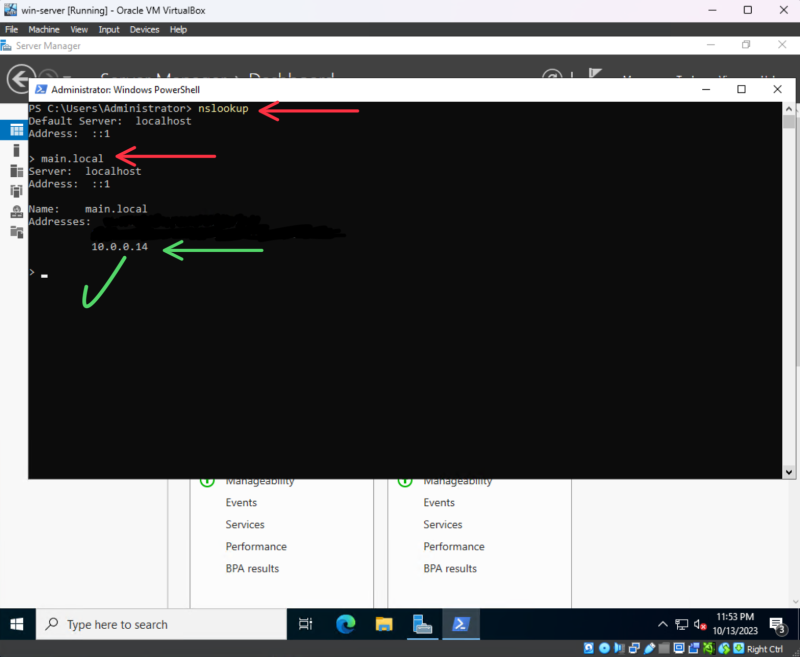
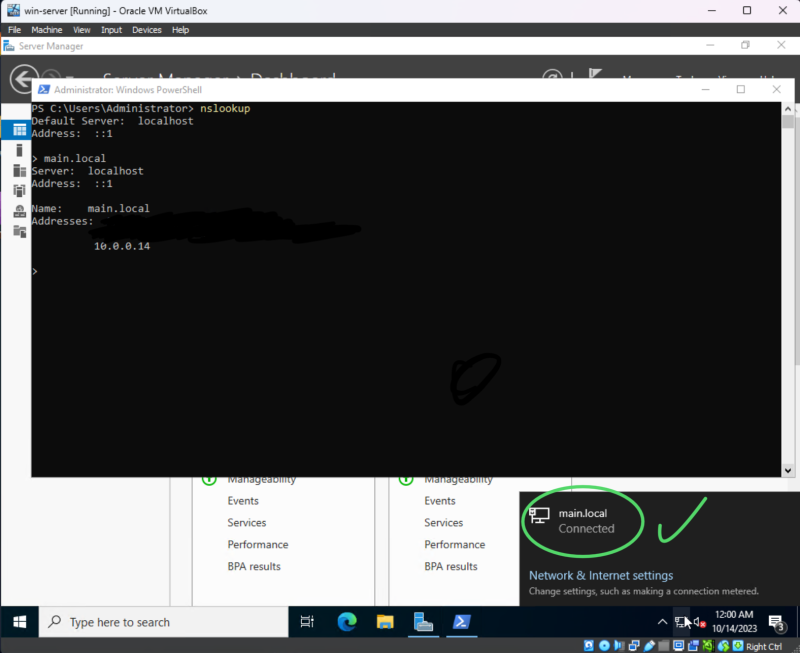
And when we hover over our network connection in the toolbar and click on our network connections,
We should be connected to our domain.
Configuring Active Directory:
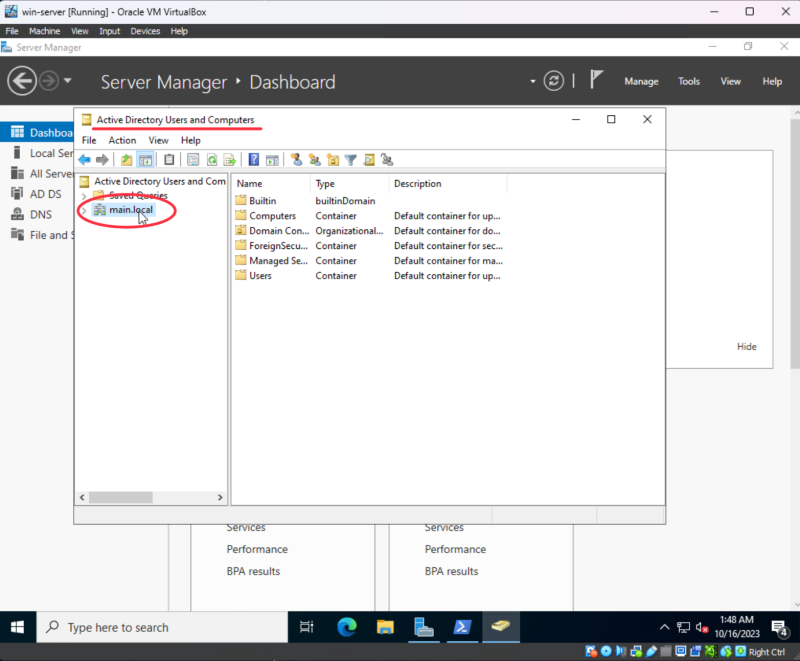
Now, let’s create a new user in Active Directory.
Click on “Tools”
Then “Active Directory Users and Computers”
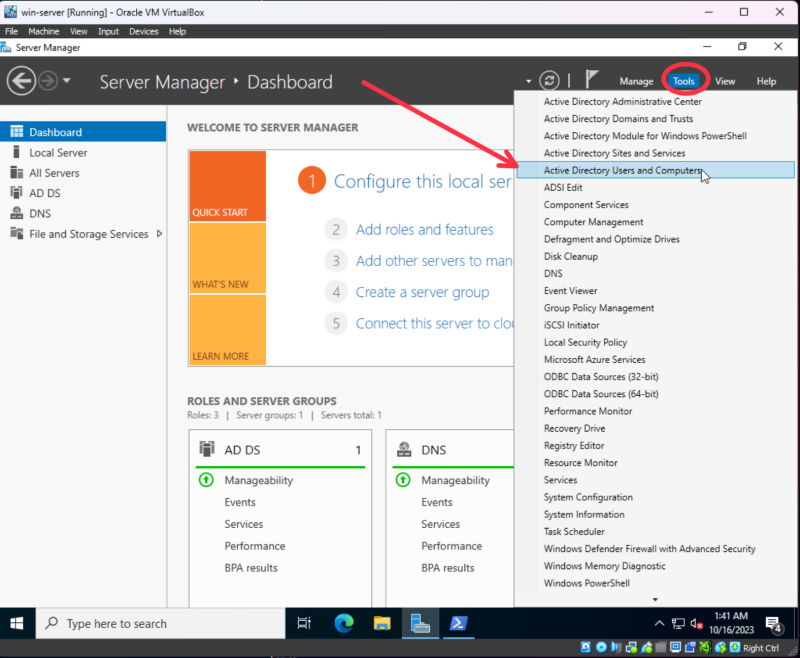
Next, click on your domain
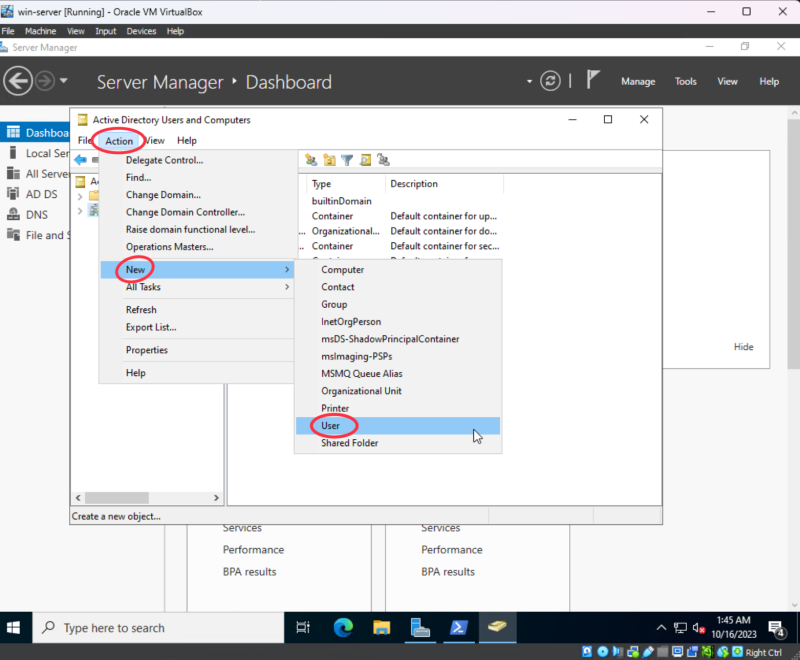
click “Action”
Then click on “New”
and click on “User”
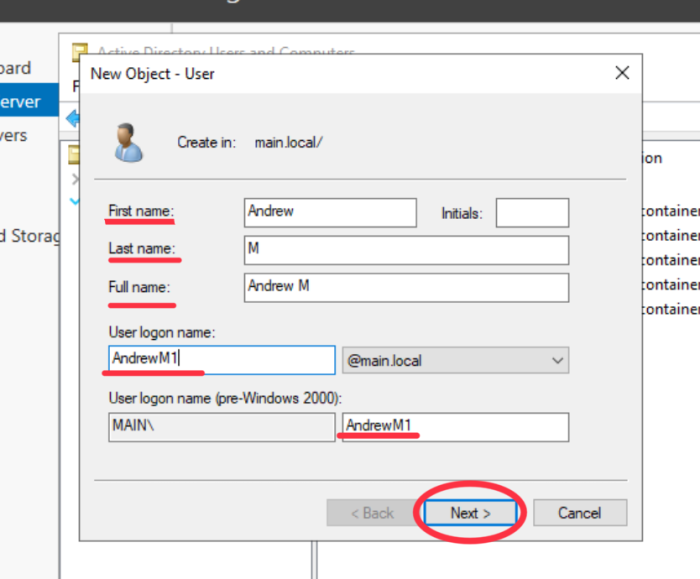
This will open the New Object wizard to create a new user.
Type in the user’s First and Last name, and their login name.
Then click “Next”
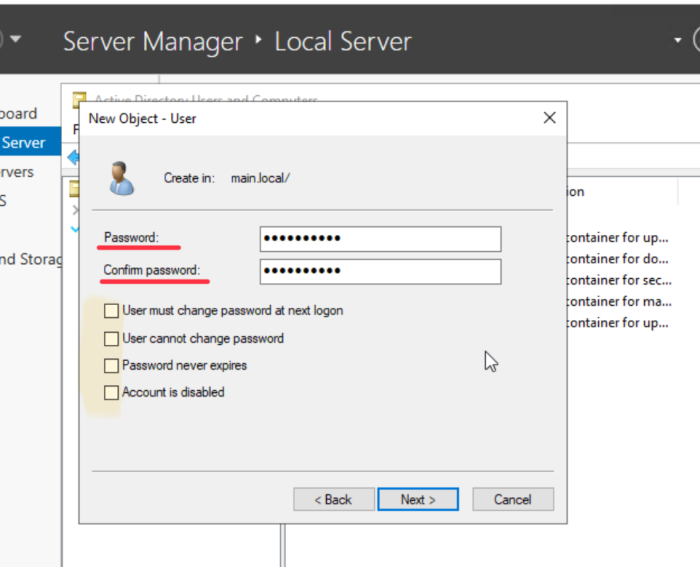
Next you’ll need to create the user’s password.
You are then given a few options for password set up.
Depending on your use case, you would set a temporary password, and have the user log in with that password, and force them to change it upon their next log in using the checkbox labeled: “User must change password at next log in”
However, in my case, I am creating a user for myself. So I will not check that box, to avoid resetting my password I just created.
Then, we’ll click “Next”
After that,
Verify our entries are accurate, and click “Finish”
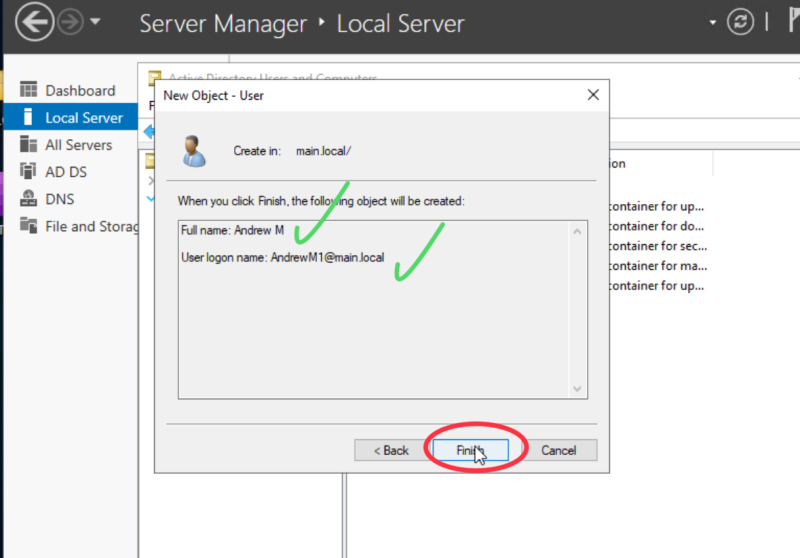
Now we are going to give our user we created Admin rights.
First, double click on the user we just created, or right click the user and then click “properties”
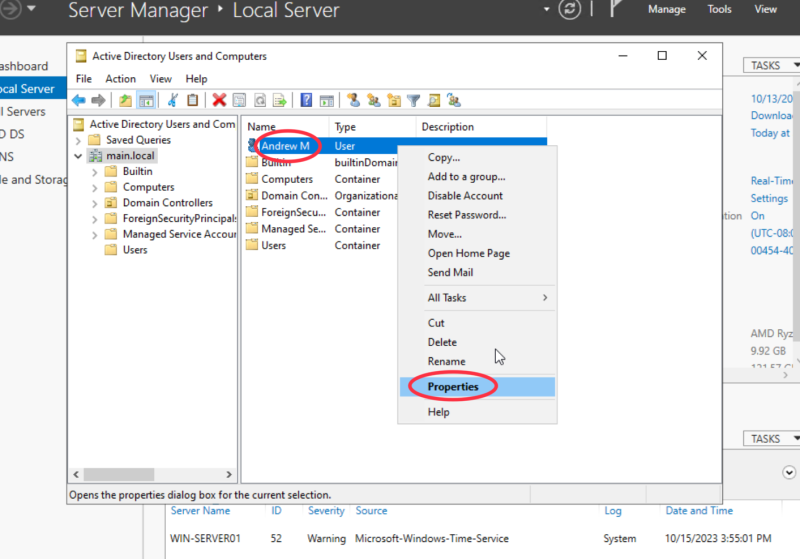
Then, go to the “Member of” tab
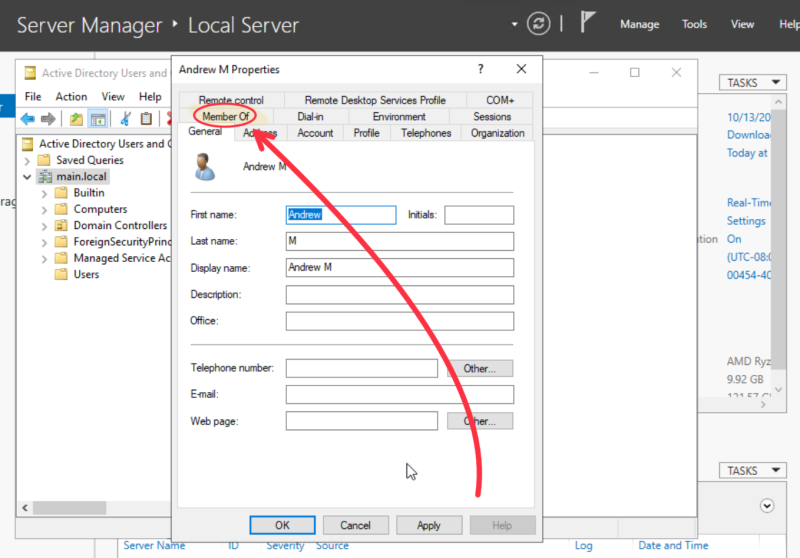
Now, click on “add”
In the “Select Groups” window,
Type “Admin” in the text box, and click check names. This should alter “Admin” to “Administrators”
Then, click OK to close the “Select Groups” Window
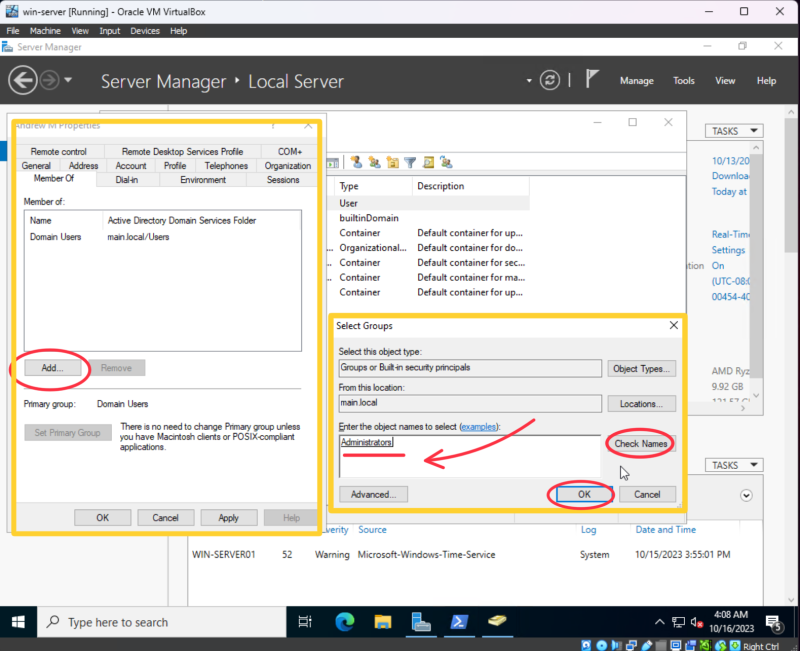
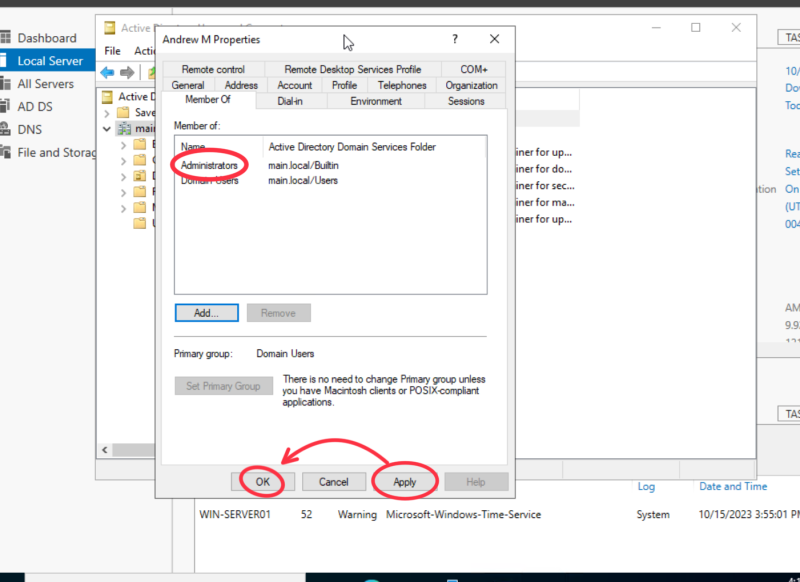
Verify the Administrators group has been added to the account, and click “Apply”,
Then click “OK” to close the User Properties window.
Now, let’s join a Windows 11 PC to the Active Directory Domain and login with our new user.
Joining a Windows 11 PC to the Domain:
Now that our server is all set up with a user for us to log into that is not the Admin user itself, let’s open up network settings on our Windows 11 machine,
and set our DNS to the IP of our Windows Server Domain Controller.
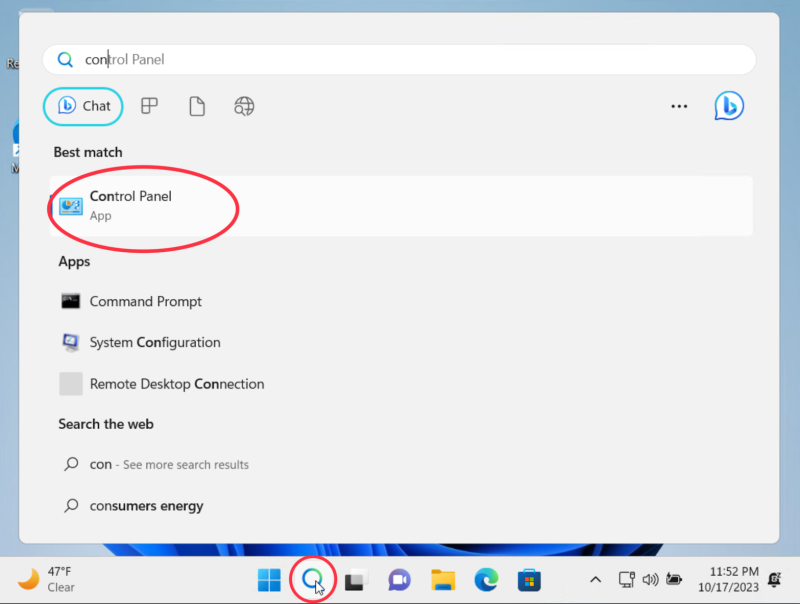
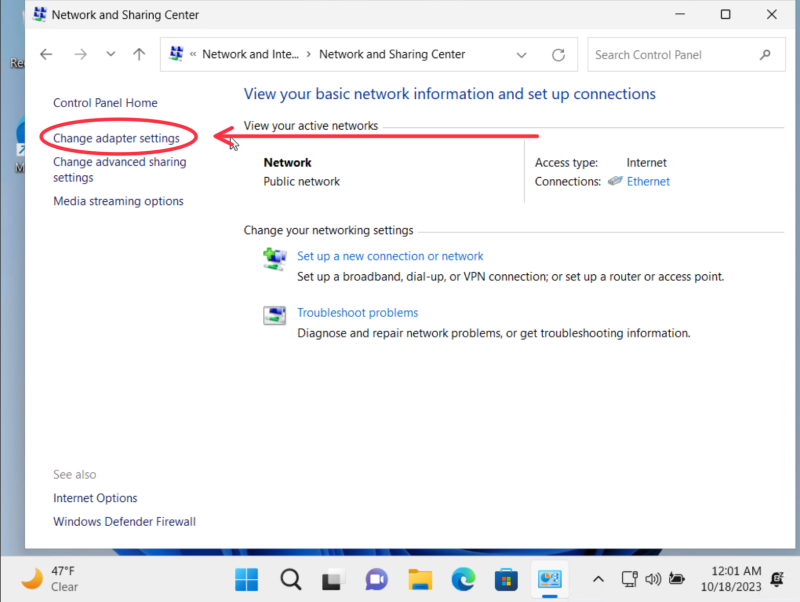
Click on search and search for “Control Panel”, then open “Control Panel”
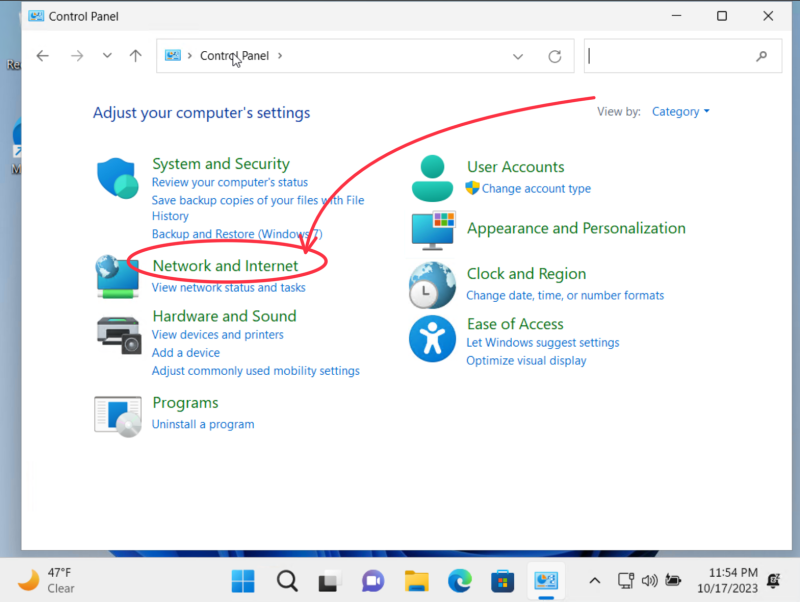
Then navigate to “Network and Internet”
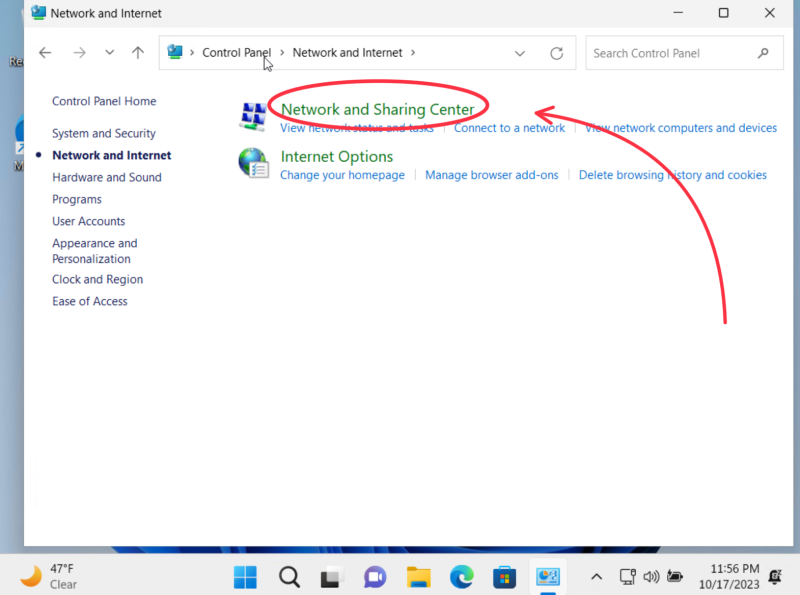
Then head to “Network and Sharing Center”
Then click change adapter settings
Then right click on the shown network adapter, and click “Properties”
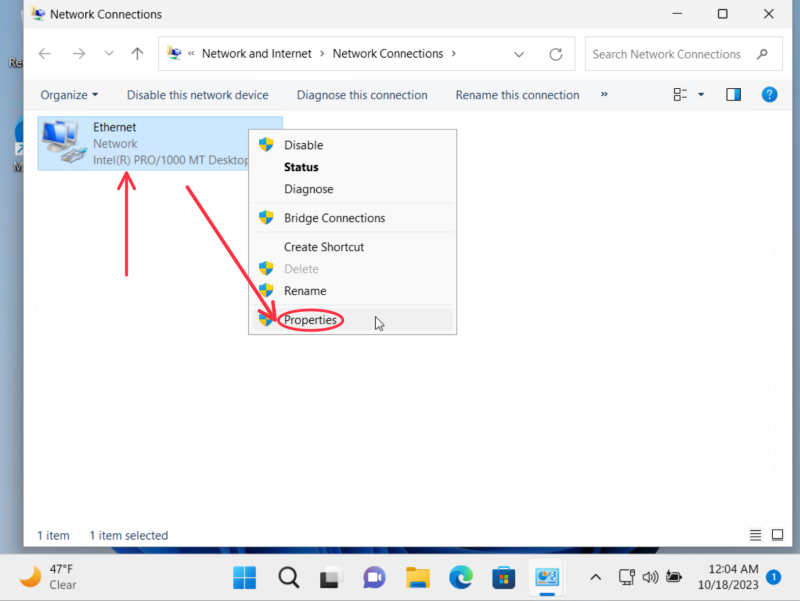
Hoping this is starting to look familiar when we did this for the Windows Server!
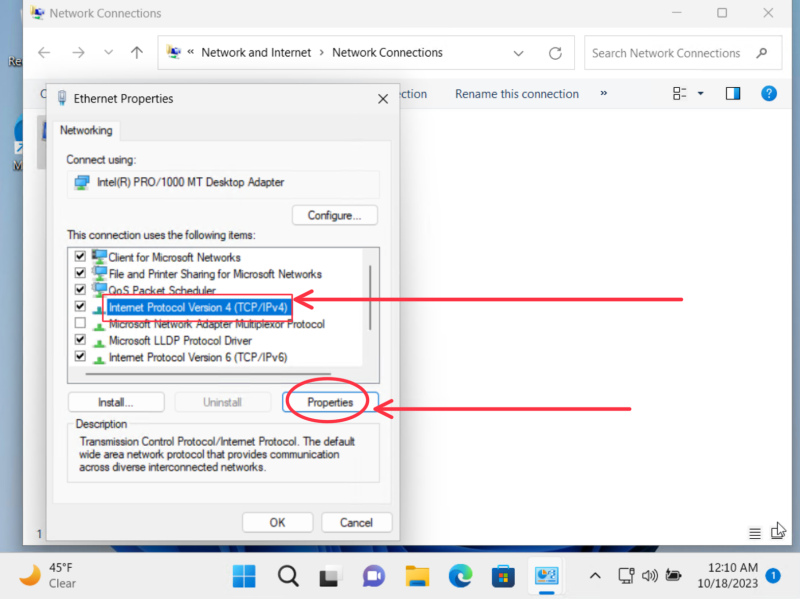
Head over to the “Internet Protocol Version 4 (TCP/IPv4)” item, and click “Properties”
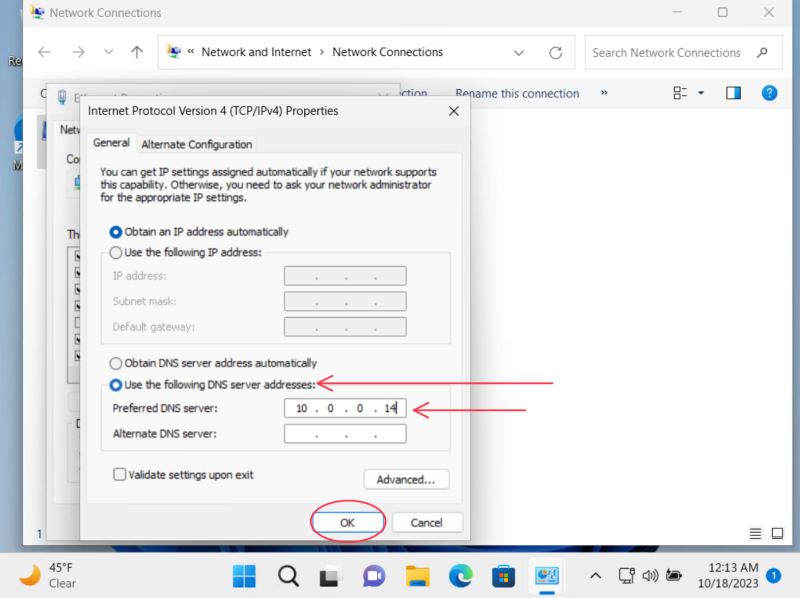
Now click the “Use the following DNS server address:” option
and set the DNS address to the same IP address as the Windows Server.
Then click “OK”
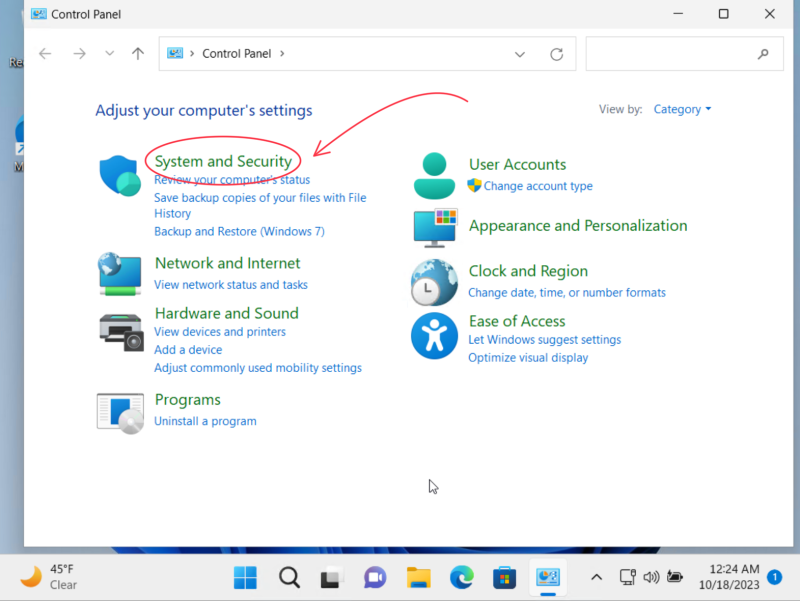
Now, go back to “Control Panel” and click “System and Security”
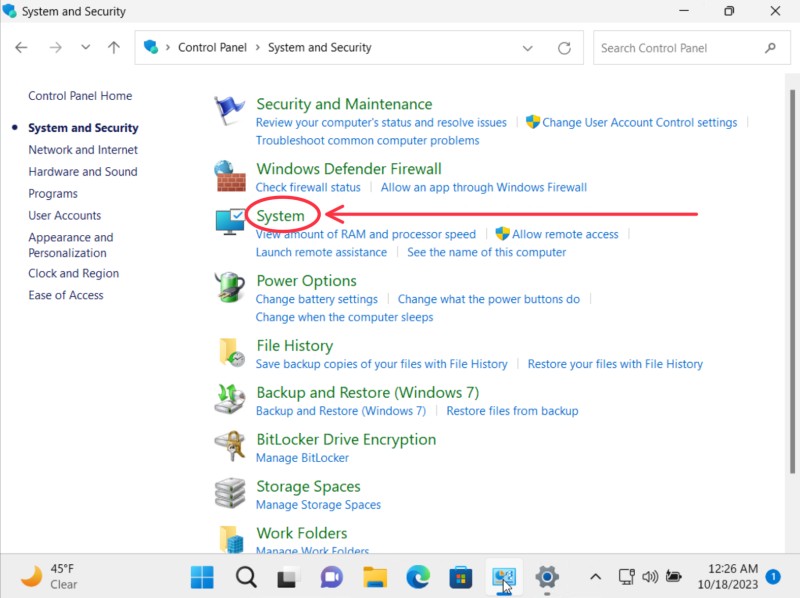
Then click “System”
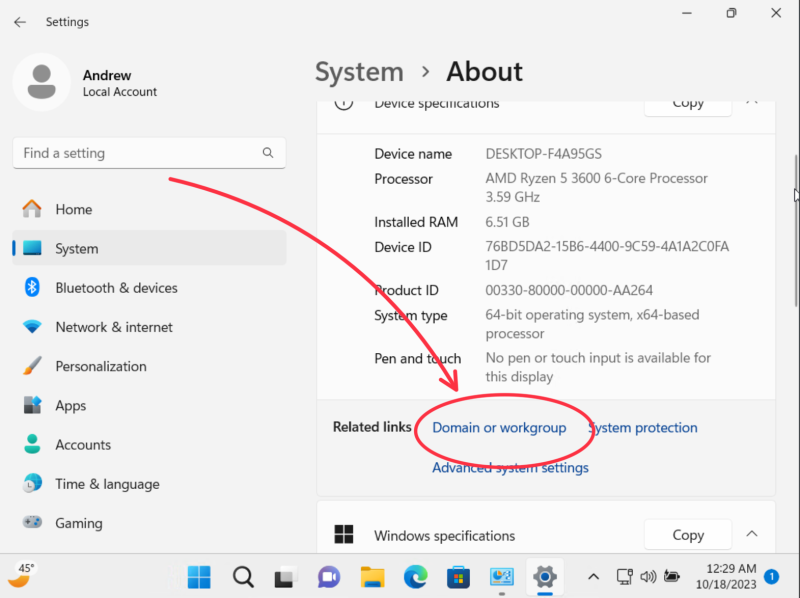
Now scroll down to “related links” and click “Domain or workgroup”
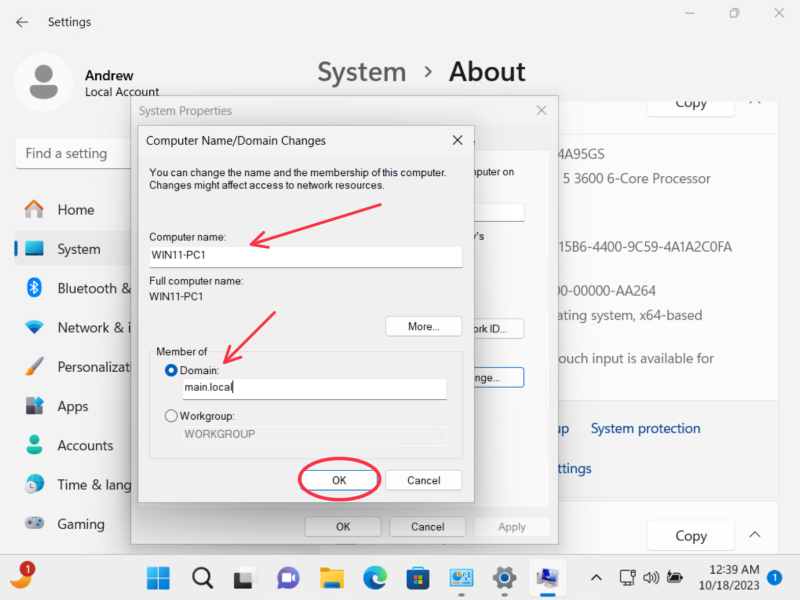
Now click the “Change” button to change this PC’s workgroup or domain
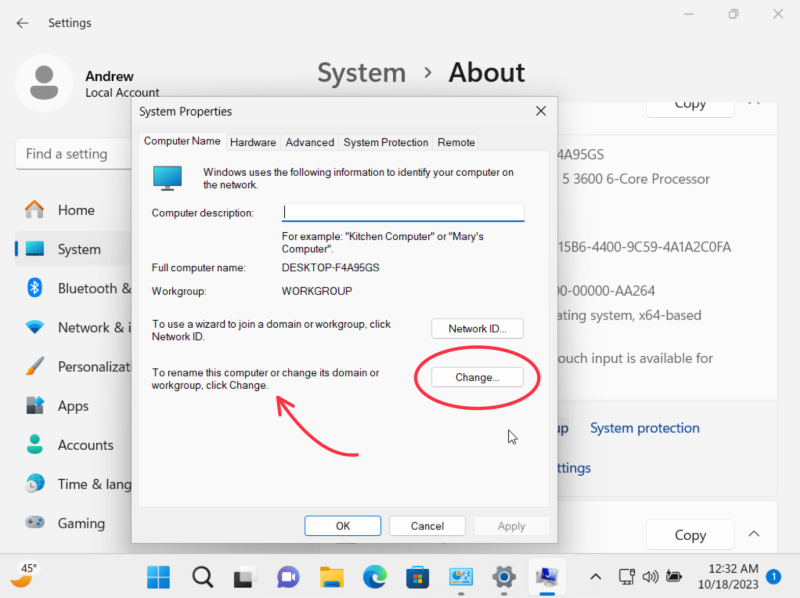
Now rename the PC to your desired name, and click on “Domain” and type in the domain name we set up on Windows Server earlier
Now, a login box should pop up.
Type in the name and password for the user you created, and click ok
After a few seconds, depending on network speed, you should now be connected to the domain.
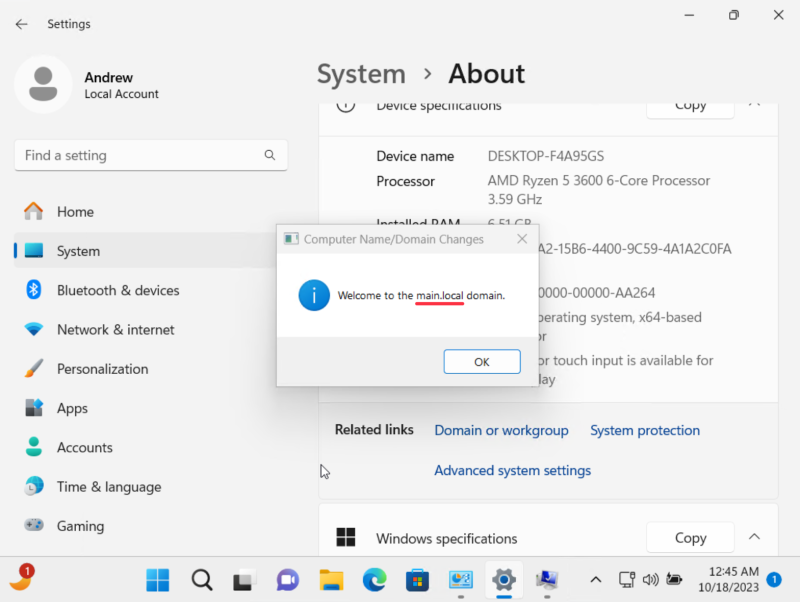
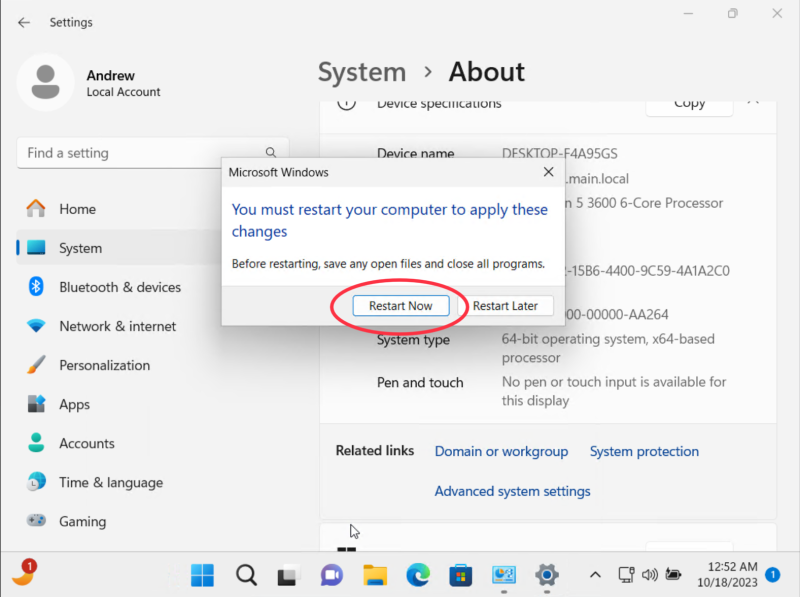
Now, the machine needs to restart for the changes to take effect.
After closing out the properties windows, you should be presented with message box asking if you would like to restart, click “Restart Now”
After restarting, you should be prompted to log in, click “other user” and log in with the user that we used to join the PC to the domain
You should now successfully be logged in with the user you created in Active Directory. Congratulations!

Conclusion
You've successfully completed a comprehensive walkthrough for setting up Active Directory in your network. By following these steps, you've laid the foundation for efficient user and resource management. Here's a quick recap of what you've accomplished:
Building a Windows Server Virtual Machine: You started by creating a virtual machine, providing the essential infrastructure for your domain controller. This flexibility allows you to scale your network as needed.
Setting up Windows Server Installation: You installed Windows Server, ensuring a clean and well-configured operating system ready for domain controller setup.
Promoting to a Domain Controller: Through the Active Directory Domain Services role, you elevated your server to the role of a domain controller. This centralizes user and resource management.
Setting Static IP addresses: A static IP address is crucial for consistency and stability within your network. This ensures that your domain controller can be reliably accessed by all devices.
Creating a User: You added a user account to your domain, allowing you to control access to network resources and manage permissions easily.
Joining a PC to the Domain: You successfully joined a computer to the domain, demonstrating the seamless integration of client devices into your Active Directory environment.
This guide has equipped you with the essential skills to set up and manage an Active Directory domain, efficiency, and organization within your network. As you continue to explore the capabilities of Active Directory, you'll find that it offers much more than what's covered here. Features like Group Policy, security policies, and DNS management can further improve your network administration.
Remember that maintaining your Active Directory environment is an ongoing process. Regularly update and back up your domain controller, monitor its performance, and adapt your network's organization as your organization grows.
For more advanced configurations, consult Microsoft documentation, join relevant IT communities, and explore additional resources to deepen your understanding of Active Directory.
Thank you for following this guide, and I hope it serves as a valuable resource for your Active Directory journey.
Best of luck with your Active Directory management, and may it contribute to the success of your IT endeavors.
Please comment and share!
Happy networking!
-Drew
